Project guides
A project guide in SuperOffice CRM is a process management tool that simplifies and standardizes project execution by linking project types to predefined statuses. Each status includes specific follow-ups, documents, and milestones to guide you through the project lifecycle. This structured approach ensures consistency across projects while helping project managers stay on top of tasks and key deliverables.
By default, several project guides are available in SuperOffice CRM. You can use these as-is or customize them in Settings and maintenance to align with your company's workflows.
What is a project guide?
A project guide consists of:
- Statuses: Different phases of a project, such as Planned, In Progress, and Closing.
- Follow-ups: Actions like to-dos and meetings associated with each status.
- Documents: Relevant files, such as reports or memos, linked to the project.
- Milestones: Key follow-ups that marks significant progress in the project.
When you create a project or update its type to one with a linked guide, the guide automatically activates in the Project guide section tab. This tab displays the statuses, associated activities, and next steps for the project.
Example:
For a Conference project type, the guide might include:
- Planned: Contains a "Planning meeting" follow-up and a "Conference programme" document.
- In Progress: Tasks for creating a delegate list and sending invitations.
- Closing: An evaluation meeting and a final report.
Project guides are set up in Settings and maintenance and can be tailored to fit your organization's specific workflows.
How a project guide works
Start with a status: When you create or update a project with a linked project guide, the first status is automatically set. The Project guide section tab displays the follow-ups and documents associated with this status.
Create activities: Each follow-up or document in the guide can be created directly from the section tab:
- Click Create next to the follow-up or document name.
- Complete the prefilled fields in the dialog and save.
Tip
Assign follow-ups to team members for efficient collaboration. The Assign task to project member dialog appears for selected follow-ups.
Mark tasks as completed: After completing an activity, check the box next to its name in the Project guide section tab. Documents are marked as completed automatically upon creation.
Completed items also appear in the Activities section tab.
Move to the next status: Once all activities for a status are complete, or as needed:
- Move the project to the next status manually or automatically (if defined in Settings and maintenance).
- The guide updates to display follow-ups and documents for the new status.
Repeat for all statuses: Work through each status, completing the suggested activities, until the project is marked as finished.
Note
You can move to the next status without completing all follow-ups for the current status.
Project guide section tab
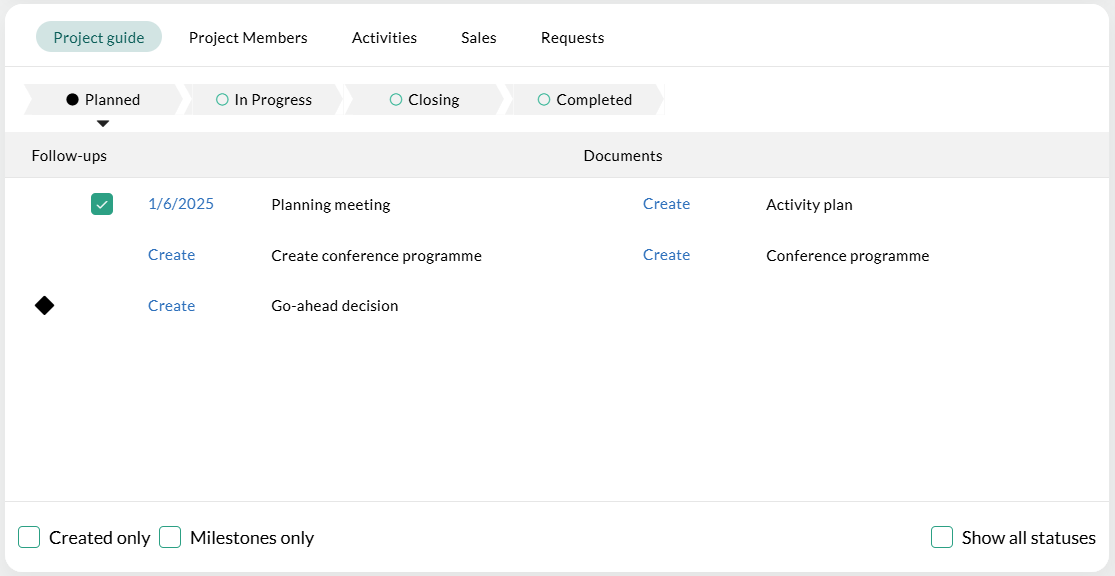
The Project guide section tab displays a structured overview of the project's predefined statuses, follow-ups, and documents. This tab allows users to track and execute tasks seamlessly, ensuring projects progress as planned.
Key components
Status buttons: Located at the top, these represent predefined statuses, such as Planned, In Progress, Closing, and Completed.

- Current status: Highlighted with a filled circle ().
- Future statuses: Marked with an open circle ().
- Completed statuses: Marked with a check ().
Activities: The tab is divided into two columns: Follow-ups and Documents. Each row includes a Create link, enabling users to generate the required follow-up or document directly from the section tab.
Milestone activities are identified with a diamond symbol (). The Next milestone field on the Project card automatically shows the date of the next milestone, helping users track important project deadlines.
Filters: Located at the bottom, these checkboxes adjust the display:
- Created only: Shows only completed or in-progress follow-ups and documents.
- Milestones only: Shows only milestone follow-ups.
- Show all statuses: Reveals all statuses and their associated follow-ups and documents.
Tips for use
- Quick navigation: Use the status buttons to focus on activities specific to a single phase of the project.
- Efficient tracking: Mark activities as completed or create tasks directly from this tab.
- Customization: Adjust filters to focus on milestones or created activities.
Create a follow-up or document
To create a follow-up or document linked to a project guide:
Go to the Project guide section tab.
Locate the follow-up or document under the current status.
Click Create next to the item.
For follow-ups, the Follow-up dialog opens with prefilled fields based on the project guide's settings. Modify as needed, then click Save.
For documents, the Document dialog opens with a preselected template. Complete the required fields and click Save.
Tip
You can create multiple follow-ups or documents of the same type by right-clicking an item and selecting Create another.
Mark a follow-up as completed
- In the Project guide section tab, locate the follow-up.
- Check the box next to the follow-up's name. The task is marked as completed and appears in the Activities section tab as finished.
Documents are automatically marked as completed upon creation.
Move to next status
Progressing through a project's statuses is a core feature of the project guide. Moving to the next status can be done automatically or manually, depending on your workflow needs.
Automatic status progression
If the project guide is configured to suggest the next status, the Project guide - move the project to the next status dialog appears when all required follow-ups and documents in the current status are marked as complete.
- Complete all required follow-ups and documents for the current status.
- When the dialog appears, click Yes to move to the next status or No to remain in the current status.
Note
Automatic progression must be enabled in Settings and maintenance for this feature to work.
Manual status progression
You can manually move the project to the next status if needed, without completing all follow-ups and documents in the current phase. When you change a status, such as from Planned to In Progress, the previous status is automatically marked as completed with a checkmark in the Project guide section tab.
From the Project guide section tab
- Right-click the button for the desired status.
- Select Move to this status from the menu.
From the Project card
- Click the Edit () button on the Project card.
- Click the arrow next to the Status field to open the list.
- Select the required status.
- Click Save to confirm your changes.
Tip
You can also return to a previous status by following the same steps.
Benefits of using project guides
- Consistency: Ensures a standardized approach to project management across your team.
- Visibility: Keeps the entire team updated on the current status, next steps, and key milestones.
- Customization: Tailor guides to match your organization's unique workflows and processes.