Tutorial - email mailing
Tip
Click the Save + close button to save the mailing and close it. You can continue working on the mailing later.
Step 1: Setup
You can create your new mailing in the Marketing screen in the Mailings tab. Click on the Create mailing button and you will get to the first step where you can set up your mailing.
The first step in creating an email mailing, is called Setup. Here you can set the email header information such as sender, reply-to address and subject. You can also add attachments, set archive options for the mailing and select tracking options.
Enter a name in the Name of mailing field.
Enter the subject of the email in the E-mail subject field.
In the From list, select Always use and enter the sender's email address in the field below to use the same sender for all mailings. You can also choose a sales contact or support contact as the sender, if one is defined for this recipient. Enter an email address to be used if no sales contact or support contact is available. If your admin has activated the global email validation preference, select the domain you want to send from in the drop-down list.
Note
SuperOffice will conduct a Sender Policy Framework (SPF) look-up to verify that the domain you are sending from has a valid SPF record. You will not be able to send the mailing from a domain that does not have a valid SPF record.
Do not enter an email address in the From name field. It should display as a name (for example, SuperOffice Support). Using an email address in the From name can lead to your email being flagged as spam due to conflicts with SPF, DKIM, or DMARC validation rules.
In the Reply to list, you have the same options as above. In addition, you can select Use "From" as reply address. Any replies will then be sent to the sender.
Select a folder to place the mailing in from the Folder list.
In the Selection and Project fields, you can associate the mailing with a selection and/or a project. Start typing to search.
If you add a selection, any contacts in the selection are added as recipients in the mailing.
In the Type list, select the type of mailing you are creating. Select (Any) if the mailing matches two or more of the available types. Use (Any) after adding multiple recipients with multiple subscriptions and you want to send the mailing to all.
Attachments: To add one or more attachments to the mailing, use one of the following methods:
- Click Upload files (or drag here) to browse to and add a file from a disk or server.
- Drag and drop a file from Windows Explorer to the attachments field.
- Click Choose a CRM document to select a document in SuperOffice CRM.
Under Tracking are the following options:
Track all links: Select this option to track all links in the mailing. This will also include links that are not registered as tracked links in SuperOffice Marketing, for instance unregistered links from templates or old mailings, or links that are entered directly in the source/HTML code.
Use Google Analytics: Select this option to track the mailing and connect it to Google Analytics (if that is set up for your website). In the fields below, enter the data that should be added as parameters in the tracked URLs.
Medium: This field is set to Email by default. You cannot edit this field.
Source: Enter the source of the mailing, such as
superoffice-mailings.4Campaign: Enter the type of mailing, such as "newsletter" or "lead-nurturing", or enter a specific campaign name such as "spring-sale-june-21" or "upgrade-campaign-v9".
Click Next to go to the next step.
E-mail Domain Validation
If your admin has activated the global preference Only use approved e-mail domains, the From address field will be split, and you need to select the domain you want to send from in the drop-down list of approved domains. Attempting to send from a domain that does not have a valid SPF record will prompt a warning, and you will not be able to send from that domain. This applies to all email domains even if the validation preference is not activated.
Note
If the Our contact address has an email domain that has not been validated, the mailing will automatically be sent from the address specified in the Otherwise use drop-down list options.
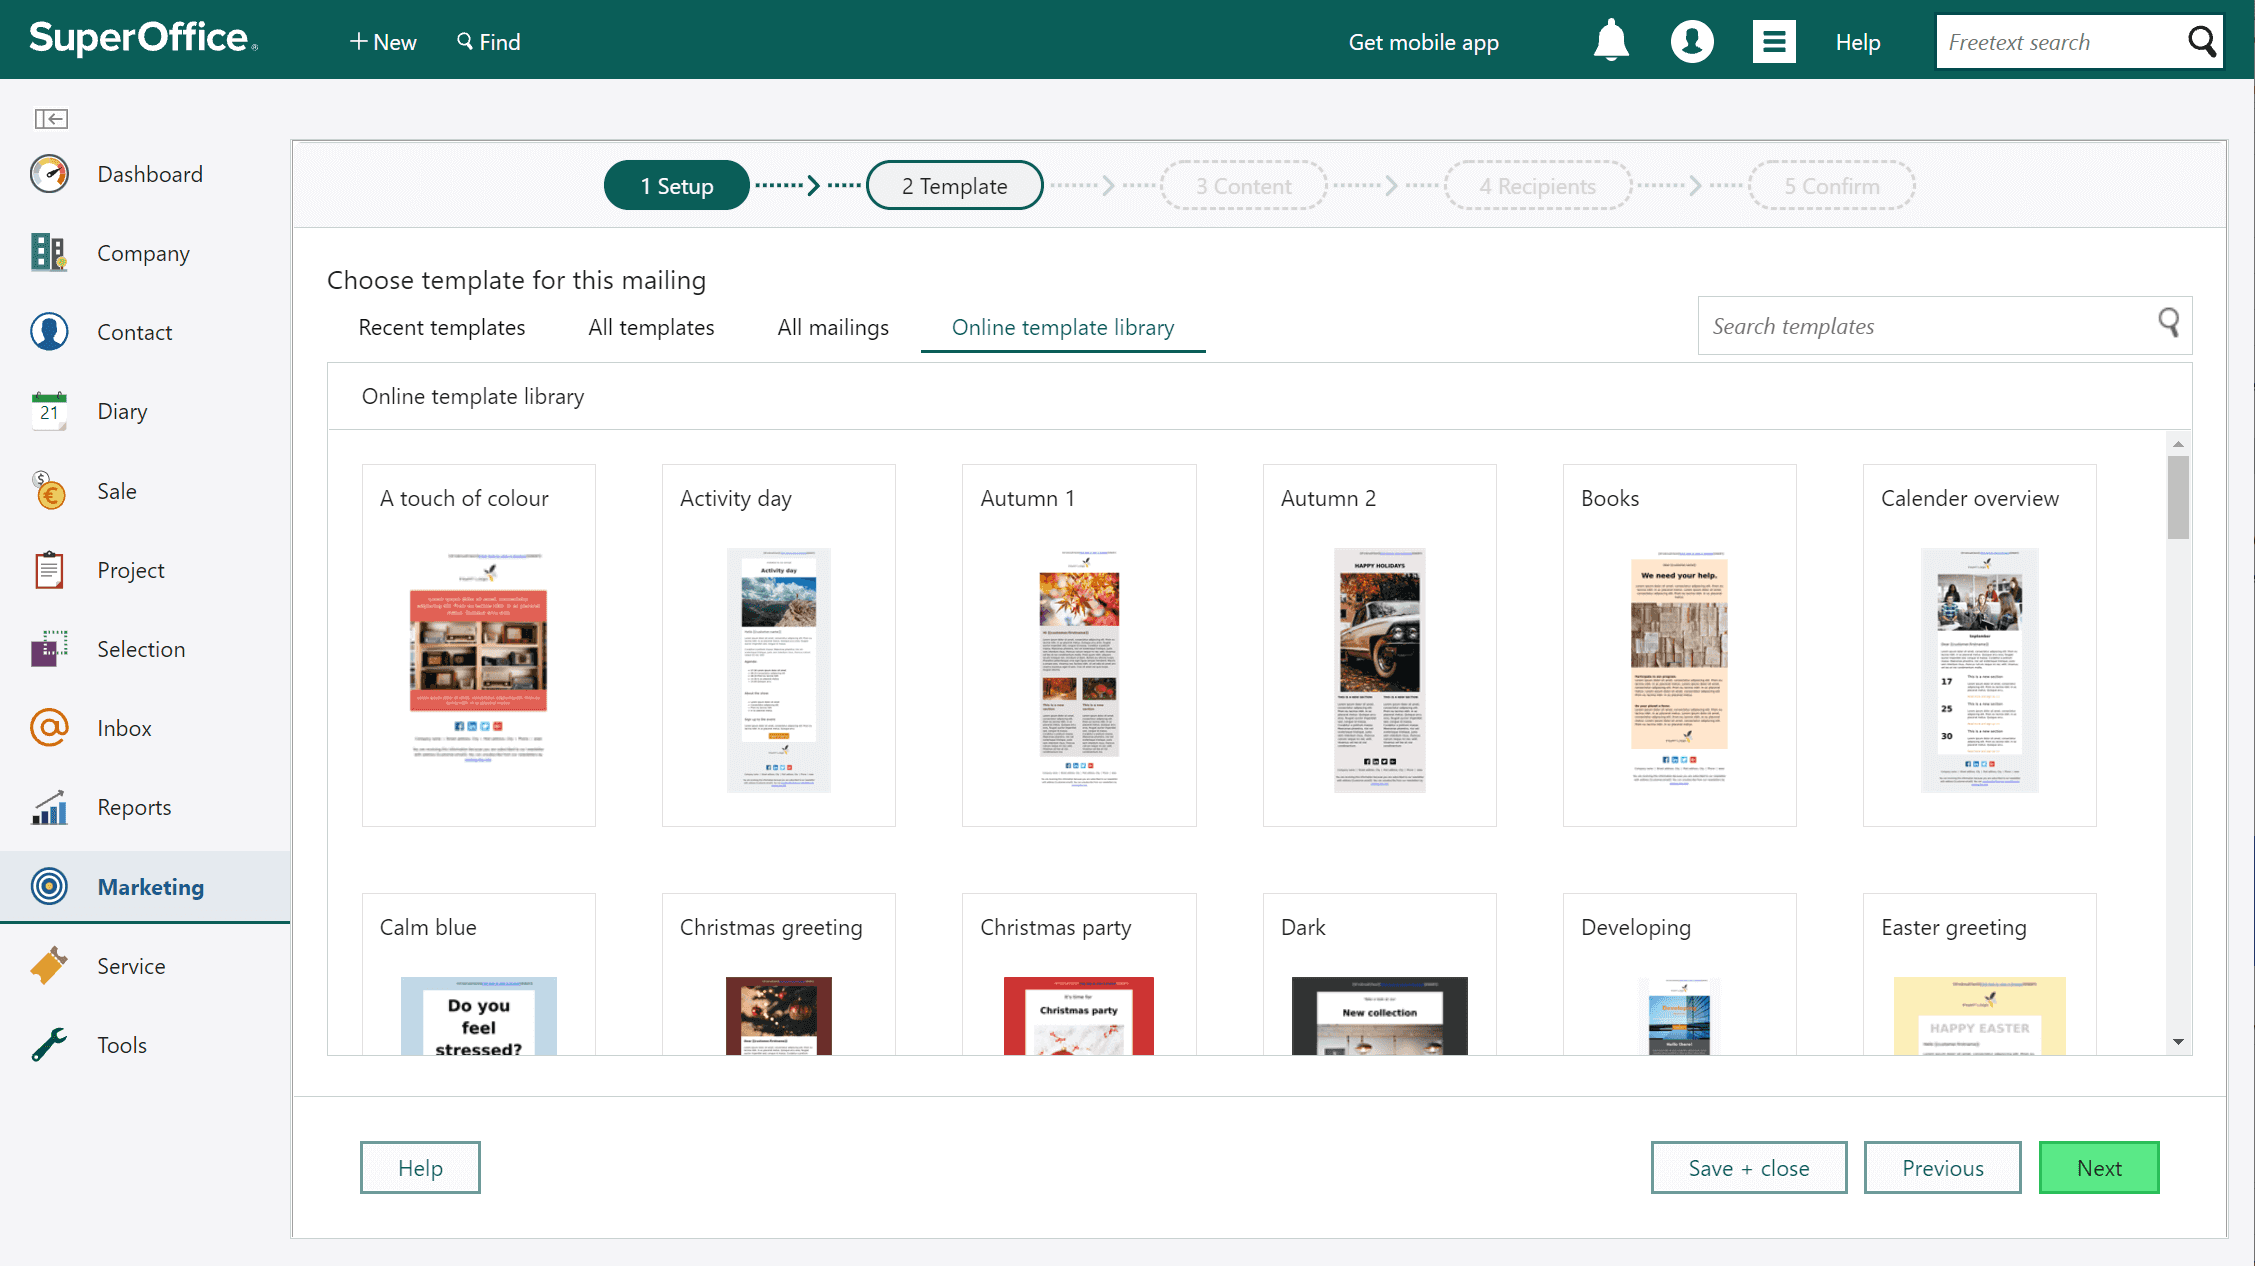
Step 2: Template
In the second step, Template, you must decide what your mailing should look like. You do this by selecting an existing template, a previous mailing, or a template from the online library.
A good message template not only supports your message, but also looks good on any device. If you want to ensure consistency in email design across the whole company, using a template is your best bet. The message template will give you the company's look and feel with correct the fonts, colors, social media platforms, and overall layout of your mailing.
After you have figured out what design you want to use, you can choose the template to base your new mailing on with a few clicks.
Tip
Save time by utilizing a free template from the Online Template Library in SuperOffice Marketing. This library offers a broad range of professionally designed message templates, all available for use at no cost.
Select a template in one of the following ways:
- Select one of the available tabs (Online template library, Recent templates, All templates, and so on) to view available mailings or templates on which to base your new mailing.
- Enter a search phrase in Search templates and press ENTER or click .
In the list below, click a template to select it.
Note
If you are using a template from the Online template library, click Use this template in the template preview window. You are automatically redirected to the Content step.
Click Next to go to the next step.
Step 3: Content
In the Content step you can edit the layout and content of the email, and add links and images.
The mailing editor gives you the flexibility and freedom to design your mailings exactly how you want them.
You can create and save content blocks that all your users can pick and choose from, helping you to not only work faster, but also ensure brand consistency. Or you can start a mailing completely from scratch.
Step-by-step guides:
- Add content, Edit a paragraph
- Insert customer-specific information
- Insert tracking link
- Add subscription links to be GDPR compliant
- Add images to the message
- Test the mailing
Step 4: Recipients
When creating a mailing, you must select the recipients of the mailing. You can add recipients from multiple sources. In addition, you can set various mailing options here and also preview the mailing.
Your target list is the group of people you believe will respond best to your message. If you tailor your marketing message specifically to that group, you get a better chance of success and avoid wasting time and effort on people who are not interested.
You can use selections, projects or add single contacts in SuperOffice CRM.
Due to the GDPR legislation, only the contacts that have expressed consent to be legally saved in SuperOffice CRM database and receive information can be added as recipients.
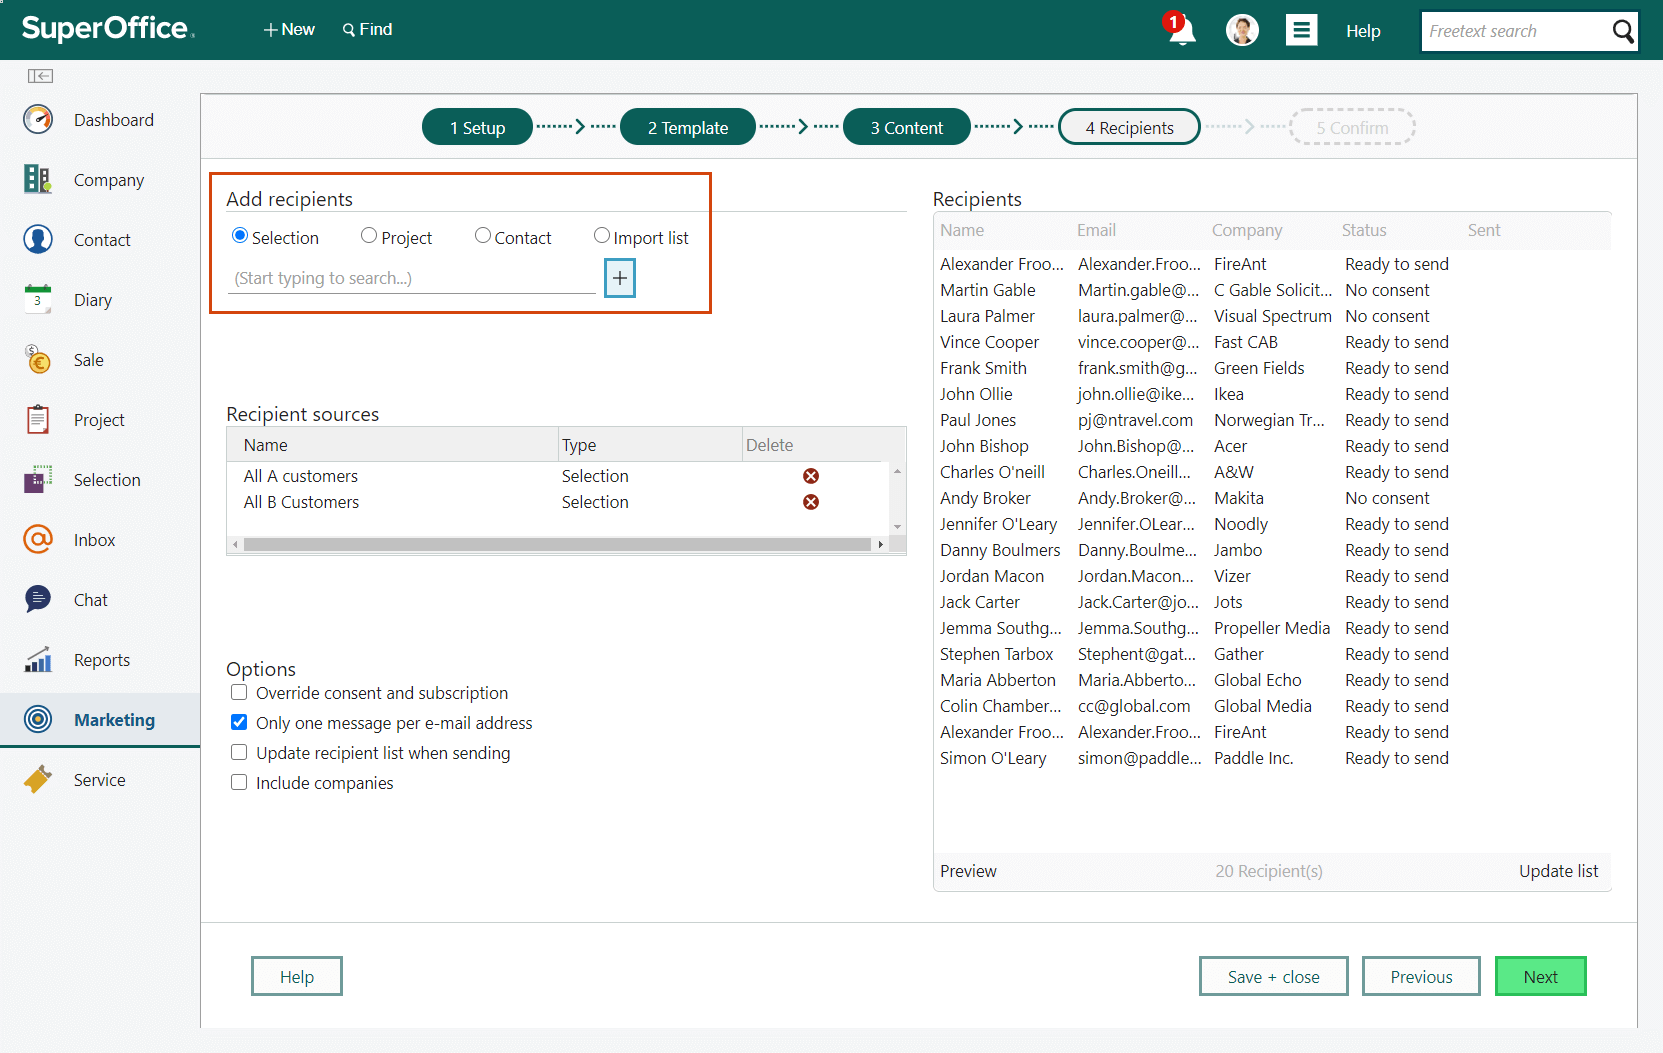
Add recipients from selections and projects
You can add recipients from selections (from both SuperOffice CRM and SuperOffice Service) and projects (from SuperOffice CRM).
Under Add recipients, click Selection or Project.
Click in the field below and start typing the name of the selection or project you want to add. As you type, a dynamic list displays the matches.
Click a selection or a project in the list.
Click +. The selection or project is added to the Recipient sources list, and the Recipients list is updated.
Repeat steps 1-4 to add more selections or projects.
Note
If you selected a selection under Archive mailing in Setup (step 1), this selection is listed under Recipient sources. You can delete this selection if necessary.
Add contacts from SuperOffice
You can add individual contacts from SuperOffice.
Under Add recipients, click Contact.
Click in the field below and start typing the name of the contact you want to add, in the field below. You can also enter a company name to display all contacts for a company.
Select the contact you want from the list that appears.
Click +. The contact is added to the Recipient sources list, and the Recipients list is updated.
Repeat steps 2-5 to add more contacts. Additional contacts will be added to the same row in the Recipient sources list, and the number of contacts will display in the Name column.
Import a list of recipients (contacts) from an external file
You can add recipients to a mailing by importing them from an external comma-separated file (for example a .txt file created in Notepad or a .csv file created in Excel).
When you import a list of names and email addresses, SuperOffice Marketing will try to locate the imported recipients in the SuperOffice database. If matches are found, the recipients' companies are listed in the Company column in the Recipients list. Any names or email addresses that are not found in SuperOffice, are filtered out and not included in the mailing. This is due to GDPR regulations.
Steps
Click Select file.
Locate the relevant file (.txt, .csv or similar text format).
Click +. The list is added to the Recipient sources list, and the Recipients list is updated.
Repeat steps 2-4 to add more recipients. Additional recipients will be added to the same row in the Recipient sources list. The total number of recipients will display in the Name column.
Note
Import is not available for document mailings.
Import file format
Each recipient must be on its own line (row).
Each recipient (row) consist of the full name and email address.
Example: "John Smith, john@company.com"
Note
You can also specify just the email address. The name will then not be available as a template variable.
Note
If you only have the mobile phone number and want to send an SMS, you can enter the following: " , , 99887766".
Recipient options
Under Options in the lower part of the Recipients screen, you can select options for the mailing based on its type.
Availability per mailing type:
| Option | Document | SMS | |
|---|---|---|---|
| Override consent and subscription | x | x | x |
| Only one message per email address | x | x | |
| Update recipient list when sending | x | x | |
| Include companies | x | x | |
| Prefer company | x | x |
Override consent and subscription: Select this option to also send the mailing to contacts who have not given their consent to receiving e-marketing or are not subscribing to this mailing type. These contacts are listed with the status No consent in the Recipients list.
Only one message per email address: Select this option to remove duplicate email addresses in the recipient list (indicated by Duplicate in the Status column). This will update the Recipients list.
Update recipient list when sending: Select this option to automatically update the recipients list before sending the mailing. See Update recipients list below.
Include companies: Select this option to include companies as recipients.
Note
If a company has no email address, the mailing will instead be sent to all related contacts in the recipient list.
Prefer company: Select this option to send the mailing only to the companies in the recipient list (and not the related contacts). Each company will only receive one mailing. Contacts that do not belong to a company, will still receive the mailing.
Note
The Prefer company option is only available if you selected Include companies above.
Preview the mailing
After adding recipients to the Recipients list, you can preview the mailing as it will look for one of the recipients. Preview is not available for document and SMS mailings.
Note
The mailing will not be sent to the recipient when previewing.
Click a recipient in the Recipients list.
Click the Preview button. The Preview window displays the mailing as it will look for the selected recipient. Any template variables (for example, name and company) are replaced by actual contact data.
Click links to check that they work, but remember to reset them if they are tracked.
Click X to close the Preview window.
Review and update the Recipients list
When you add selections, projects, contacts and import lists, the Recipients list is automatically updated. If you selected Update recipient list when sending, the projects and selections are checked before sending the mailing, if contacts were added, removed or edited.
In addition, you can click the Update list button below the Recipients list to update the list manually. Some of the contacts on the list might have changed their consent after you added them.
Note
The list displays only the first 50 recipients. Click Load all at the bottom of the list to display all recipients.
Click Next to go to Step 5: Confirm. You can still revisit the Recipients step to edit the recipients list.
Step 5: Confirm
After you have created your target list, prepared the mailing and tested it, you have finally made it to the exciting part – it is time to send your mailing.
In the final step, Confirm, you can view a summary of the mailing and verify that these are correct. Any error messages displayed in this screen must be solved before the mailing can be sent. The send options are disabled if there are incomplete steps or missing information in your mailing. These are indicated in red.
You can choose whether you want to send your mailing straight away or if you want to schedule the mailing. The advantage of scheduling your mailing is that you can choose the day and time to send your mailing. This means you can send it when you know most of your recipients will open and read your mailing.
The Confirm screen will give you a summary of the previous steps you have taken and let you either send or schedule your mailing:
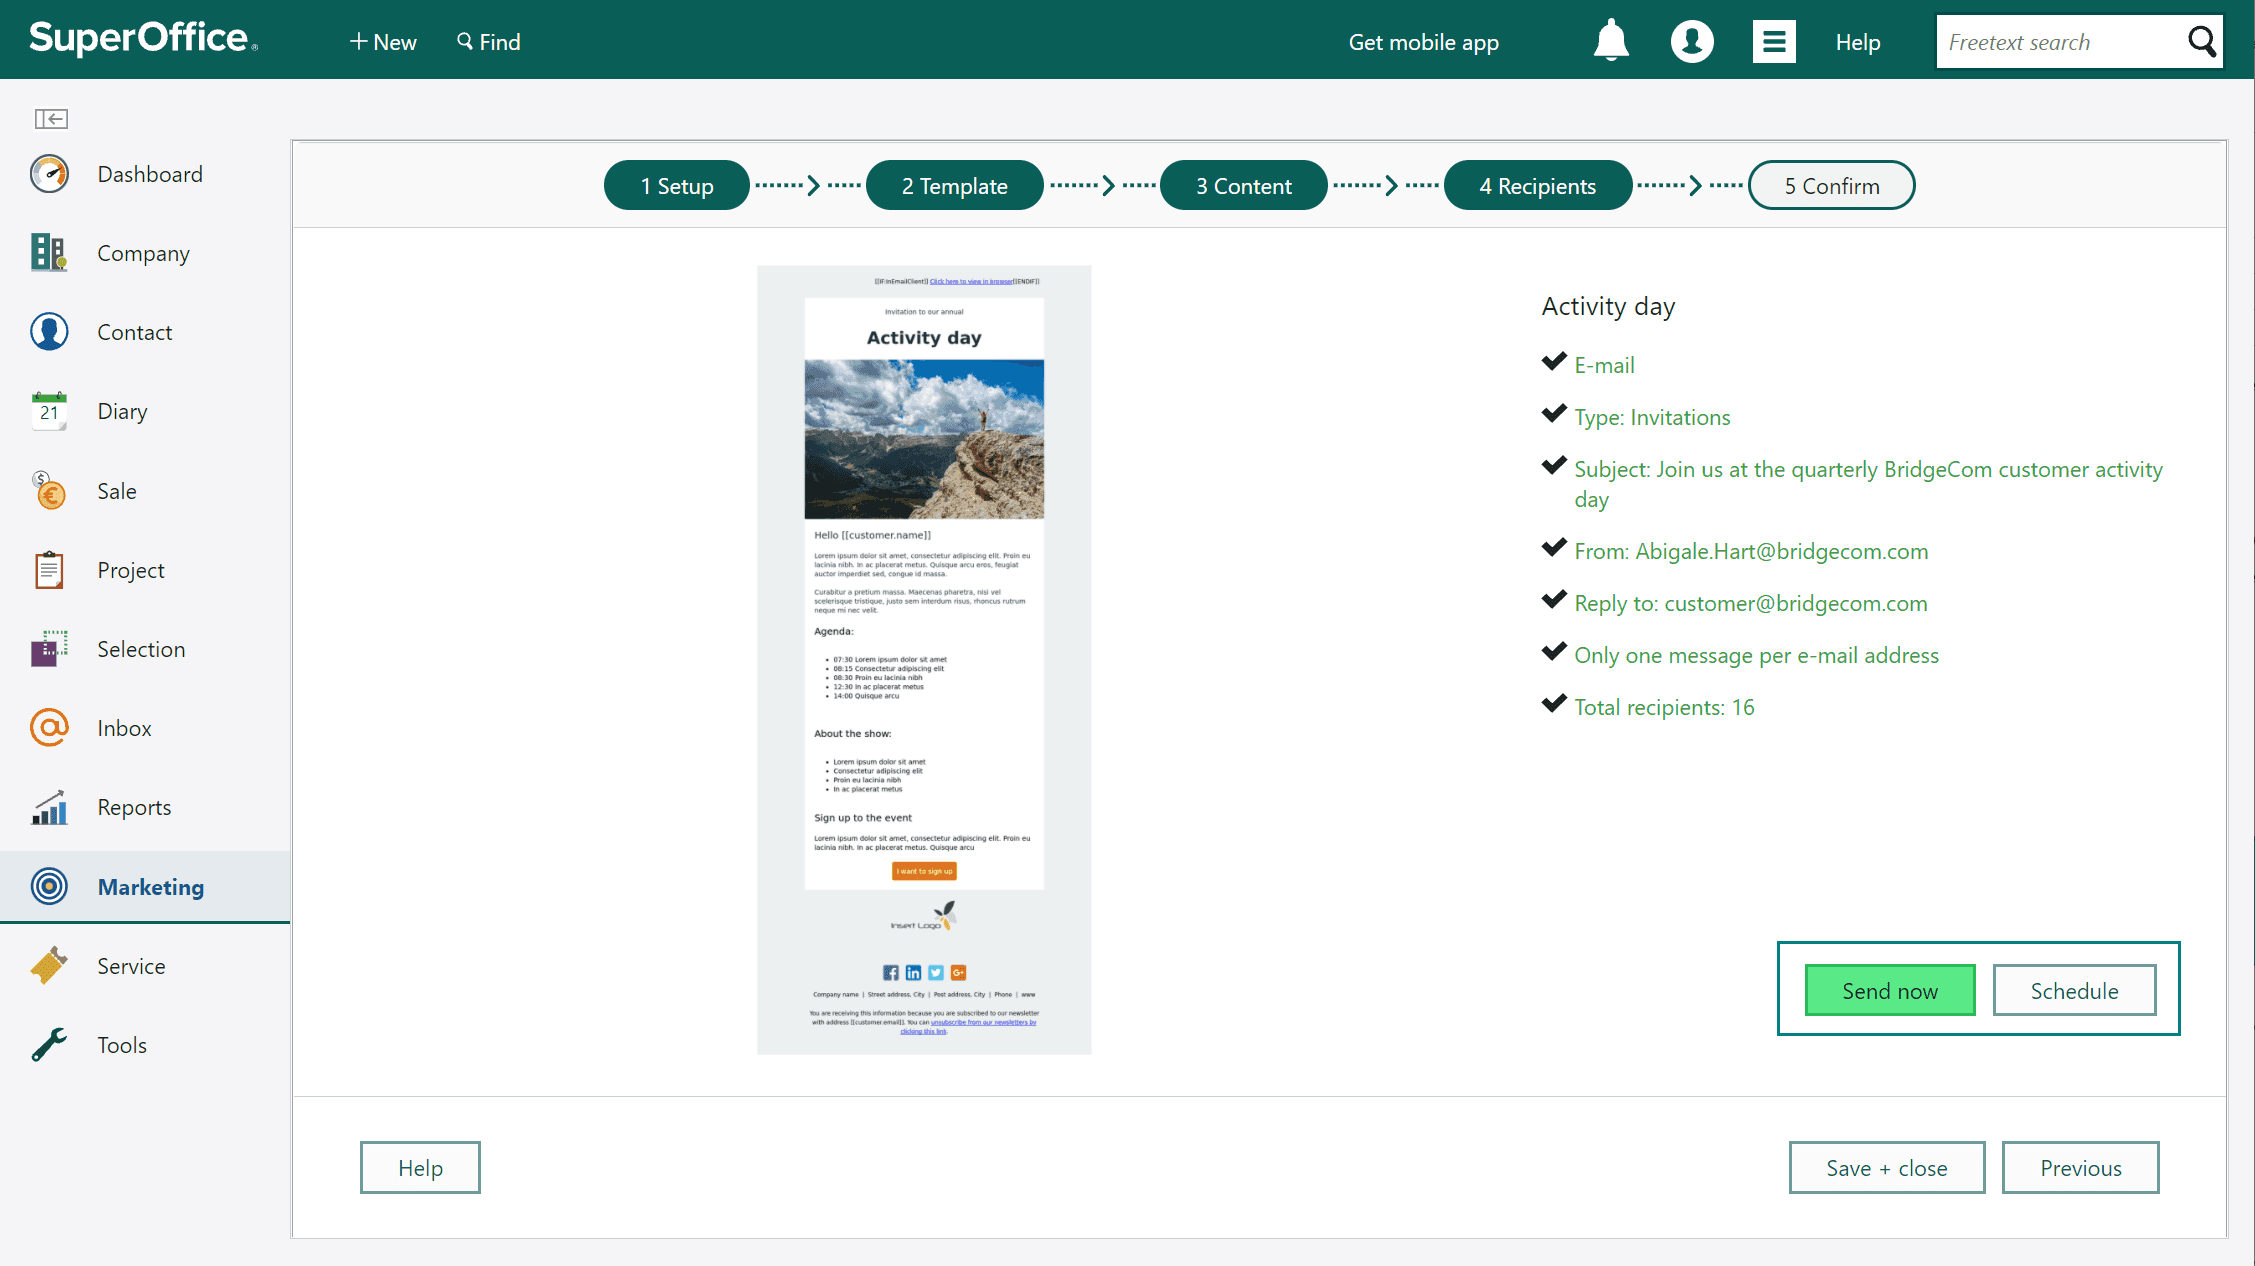
Send the mailing now
Click Send now to send the mailing immediately. The workflow closes and you are returned to the Mailings tab.
Click the mailing in the list to view sending status and statistics. How to track the mailing and view statistics.
Schedule to send
To not overload your servers during working hours, it would be a good idea to choose a time during the evening. This option is not available for mailings that have already started, temporarily stopped or have finished.
- Click Schedule.
- Under Schedule to send at, select one of the following options:
- Click the Choose date icon (), and select the date and time the mailing is to start.
- Click Set to now to insert today's date and the time.
- Click OK. The workflow closes and you are returned to the Mailings tab.
What happens now?
You can click the mailing in the list to view sending status and statistics.
To stop the mailing or start a planned mailing ahead of schedule, click the Stop or Start button respectively.