Set up lead management
Lead management in SuperOffice CRM helps you track potential customers from first contact through qualification and into the sales process. To get started, administrators must configure which company categories use Lead status, review the available status values, and optionally extend tracking with marketing data.
Note
The standard Lead, Marketing qualified lead, Opportunity, and Lost opportunity categories are included only in new databases. Existing customers must add or update categories manually to enable lead status.
Step 1: Enable lead status on a company category
Lead status can only be used for categories that belong to the Potential customer group. Ensure that at least one category is set up this way before activating lead management.
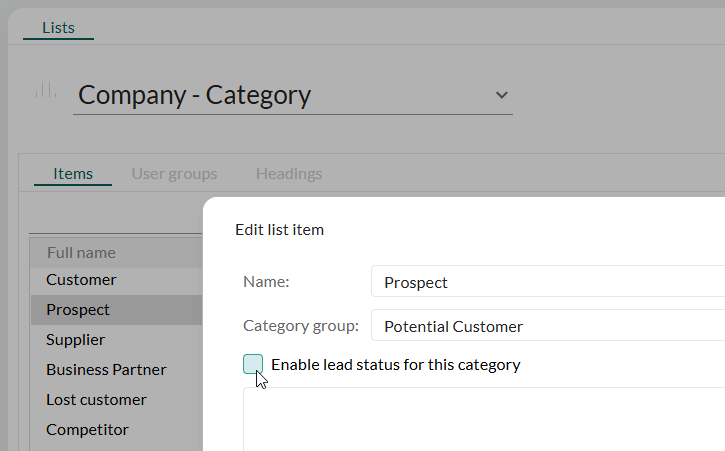
- Go to Settings and maintenance > Lists > Company – Category.
- Either create a new category or edit an existing one.
- Set the Category group to Potential customer.
- Select Enable lead status for this category.
- Click OK to save your changes.

For details, see Company category and category group.
Step 2: Customize the lead status list
The Contact – Lead status list defines the qualification stages used by your organization. By default, SuperOffice includes statuses such as Open, Contacting, Qualified, Disqualified, and Re-nurture.
Go to Settings and maintenance > Lists > Contact – Lead status.
Review the predefined items.
Add, edit, or remove statuses to match your own lead qualification process.
For example, you may want to add more detailed disqualification reasons, such as "Not interested", "Not an ICP", or "Bad timing".
For detailed steps, see Manage lead statuses.
Step 3: (Optional) Configure category automation
Category automation reduces manual work by updating company categories automatically when sale status changes or lead status is updated. For example, automatically move a lead to Customer when a sale is marked as sold.
- Go to Settings and maintenance > Workflow > Lead categorization.
- Enable the automation rules you want to use.
- For each rule, specify the target category and whether user confirmation is required.
For detailed steps, see Automate lead categorization.
Step 4: (Optional) Extend with Marketing Premium
If you use Marketing Premium, you can leverage additional tracking and automation features in your lead process:
UTM tracking: Capture the source of new leads from online forms. See Track form UTM data.
Lead nurturing flow: Distribute new leads automatically to associates. See Distribute new leads.