Define flow actions
Available actions
Note
When adding or updating flow actions, keep in mind that forms and tracked links have actions too. You should make sure there are no duplicate or conflicting actions. We recommend that you include all actions one place, either in the form or in the flow.
Send message
Things to consider:
- How often should we send new information?
- Should the next email be based on contact engagement, when a contact is filling in a form or clicking a tracked link?
- Should all contacts get the same content?
Send email (mailing)
An email step is used for sending an email to an active flow participant. You can select an already prepared email or add a new one.
Drag the Send email box from the step menu and drop it into an available slot in the flowchart.
Note
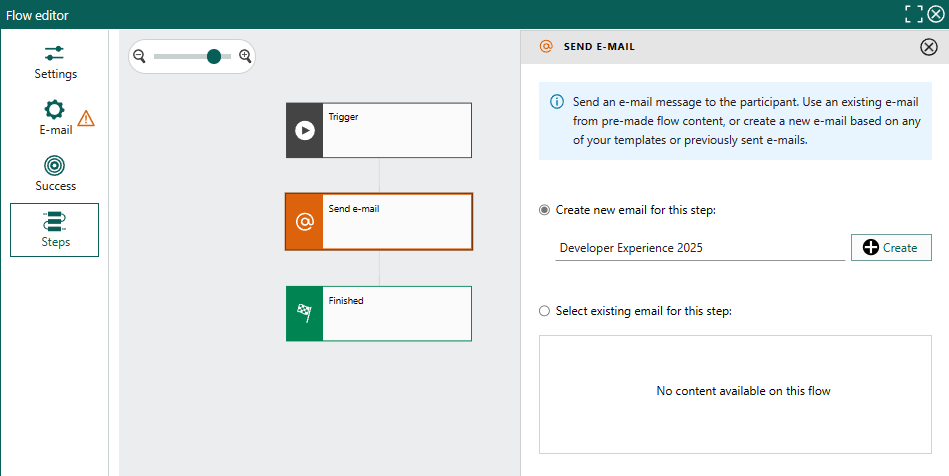
When you add an email step, you need to provide email settings before starting the flow. You will see a warning icon (like in the screenshot below) if these settings are missing. You can still save the flow! Simply continue designing the flow and return to the email settings later.
Choose one of the options:
- Create new email for this step. Enter a name and click Create. This opens the Mailing wizard at the Template step.
- Select existing email for this step. Click to select flow content.
Enter the subject of the email. Contact variables (merge tags) are available.
Optionally, add one or more attachments (max 25MB total).

Note
Creating a new email as flow content is only possible from within flow UI.
Send SMS
An SMS step is used for sending an SMS to an active flow participant.
Flow participants without a registered phone number can either skip the step (continue to next step), or exit the flow, depending on step settings
Drag the Send SMS box from the step menu and drop it into an available slot in the flowchart.
Enter the sender and the SMS text. Contact variables (merge tags) are available.
Optionally, select Exit flow if no mobile phone is registered and choose how to handle contacts who are unable to receive the SMS.
Tip
If you wish to send only one SMS, keep an eye on the counter in bottom-right corner. If the number of characters exceeds 160, the message is sent as multiple SMS segments and additional pricing may apply. We recommend to keep the message brief and informative.
Update participant
- Update contact
- Add to selection/project
- Remove from selection/project
Update contact
Use this step to update relevant data on a contact or their company, before the participant is moved into next step in the flow.
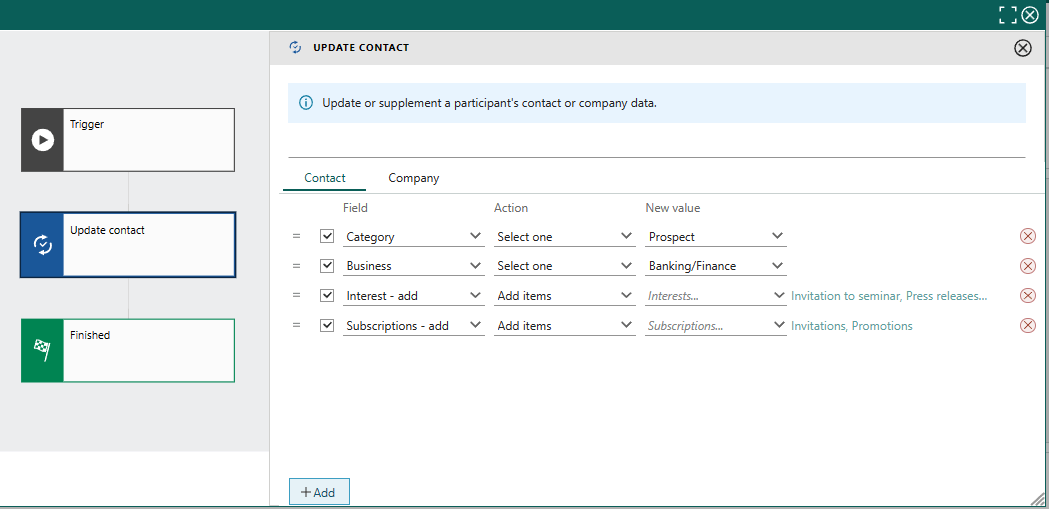
- Drag the Update contact box from the step menu and drop it into an available slot in the flowchart.
- Select a field to update in the Field column. You can also type the name in the field. As you type each letter, the list below shows relevant matches.
- Select an action in the Action column. The available actions depends on the type of field you selected in the previous step.
- Specify new values if applicable.
- To update additional fields, click Add and repeat steps 2-4.
- Make sure all the fields you wish to update - and only those - have a checkmark. You can click the red X to remove excess lines.

This works similar to bulk update.
Add to selection/project
Keep an overview of those who signed up, or was engaged, or to keep track and follow-up on later. The contact is added as member to the specified selection and/or project.
Drag the Add to selection and/or project box from the step menu and drop it into an available slot in the flowchart.
Add contact to static selection: choose a static contact selection from the list or click New to create a new one.
Add contact as project member: choose a project from the list.
Tip
Start typing to search a list.
Remove from selection/project
Contact is removed as member from the specified selection and/or project.
This step is similar to Add to selection and/or project.
Distribute to owner
Distribute contacts evenly to selected associates or members of a specified primary group. Useful for sharing inbound leads or new contacts across a team.
- Drag the Distribute to owner box from the step menu and drop it into an available slot in the flowchart.
- Select one or more associates, or a group, to assign contacts.
- Optionally, uncheck Only apply new owner if the contact is currently unassigned to overwrite any existing contact owner.
- Optionally, set a fallback associate in If no one is available, assign contacts to.
The new owner will receive a notification for each assigned contact.
Create activity
The flow can automatically create a follow-up, request, and/or sale on the contact according to settings. By connecting CRM activities and notifications, your organization can bridge the gap between marketing and sales. Creating activities also lets you focus on contacts who are engaged.
Create follow-up
Example: Set up a free consultation on the first available time in Our contact’s diary. They will be notified in the Notifications panel.
- Drag the Create follow-up box from the step menu and drop it into an available slot in the flowchart.
- Enter a title.
- Select a follow-up type.
- Specify a due date for a to-do or reserve the first available time for a meeting.
- Assign to: choose who should follow up the participant: "our contact" or "our service contact", or a specific named associate.
- Optionally, enter other information. For details, see the list of step settings and how to create a follow-up.
Create request
- Drag the Create request box from the step menu and drop it into an available slot in the flowchart.
- Enter a descriptive title.
- Select a request type, which will affect default values and available statuses and priorities.
- Select status, category, and priority.
- Owner:
- To assign the request to a specific person, select the name you require.
- Automatically assigned: If you select this option, the system assigns the request in accordance with the applicable assignment rules.
- Unassigned: You can also choose not to assign the request. The members of the relevant category then become responsible for dealing with the request.
- Enter the actual message you want to add to the request.
For details, see the list of step settings and how to create a request.
Create sale
When contact arrives this step, the contact is mature, and has shown indications of being a sales opportunity.
Drag the Create sale box from the step menu and drop it into an available slot in the flowchart.
Enter a descriptive title.
Select a sale type, which will affect default values and available stages.
Enter the required information in the other fields.
Owner: Choose who should follow up this lead: "our contact" or "our service contact", or a specific named associate.
Note
Add a follow-up too, to notify the sale's owner about this new opportunity.
For details, see the list of step settings and how to create a sale.
Internal actions
Run script
Run custom business logic by triggering a CRM script as part of the flow.
- Drag the Run script box from the step menu and drop it into an available slot in the flowchart.
- Choose a CRMScript from the list.
Note
The participant will proceed to the next step immediately after the script is triggered, without waiting for the result.
Notify by email
Send a notification email to a specific person as part of the flow.
- Drag the Notify by email box from the step menu and drop it into an available slot in the flowchart.
- Specify the recipient (To:).
- Enter the subject of the email.
- Enter the message you wish to send.
Contact variables (merge tags) are available.
Notify by SMS
Send a notification SMS to a specific person as part of the flow.
- Drag the Notify by SMS box from the step menu and drop it into an available slot in the flowchart.
- Specify the recipient (To:).
- Enter the message you wish to send. Contact variables (merge tags) are available.
If no mobile phone number is specified on the selected contacts, no SMS will be received in the other end.
Flow action vs. form action
Several action types are possible both as form action and as flow step.
A form action might:
- Add contact to selection and/or project
- Add interest to contact
- Set default category and business for new contacts and companies
- Create a request
- Send a form response mailing to contact
Flow action vs. link action
A link action might:
- Add contact to selection and/or project
- Update interests
- Add a value to an extrafield on contact
- Create a request
- Create a follow-up