Sale type
This task is done in Settings and maintenance and you must be an administrator.
The Sale type field in the Sale screen categorizes sales and defines their workflows. These types are predefined in the Sale - Type, Stages, Quote list, which you can manage in Settings and maintenance under Lists.
Each sale must have a type, and these types can be linked to specific stages and, optionally, to sales guides. Sales guides streamline the process by guiding sales staff through predefined stages, follow-ups, and documents.
Add a sale type
Select Lists in the Navigator.
Select Sale - Type, Stages, Quote from the dropdown menu. The Items tab displays all existing sale types.
Click Add to open the Edit list item dialog.
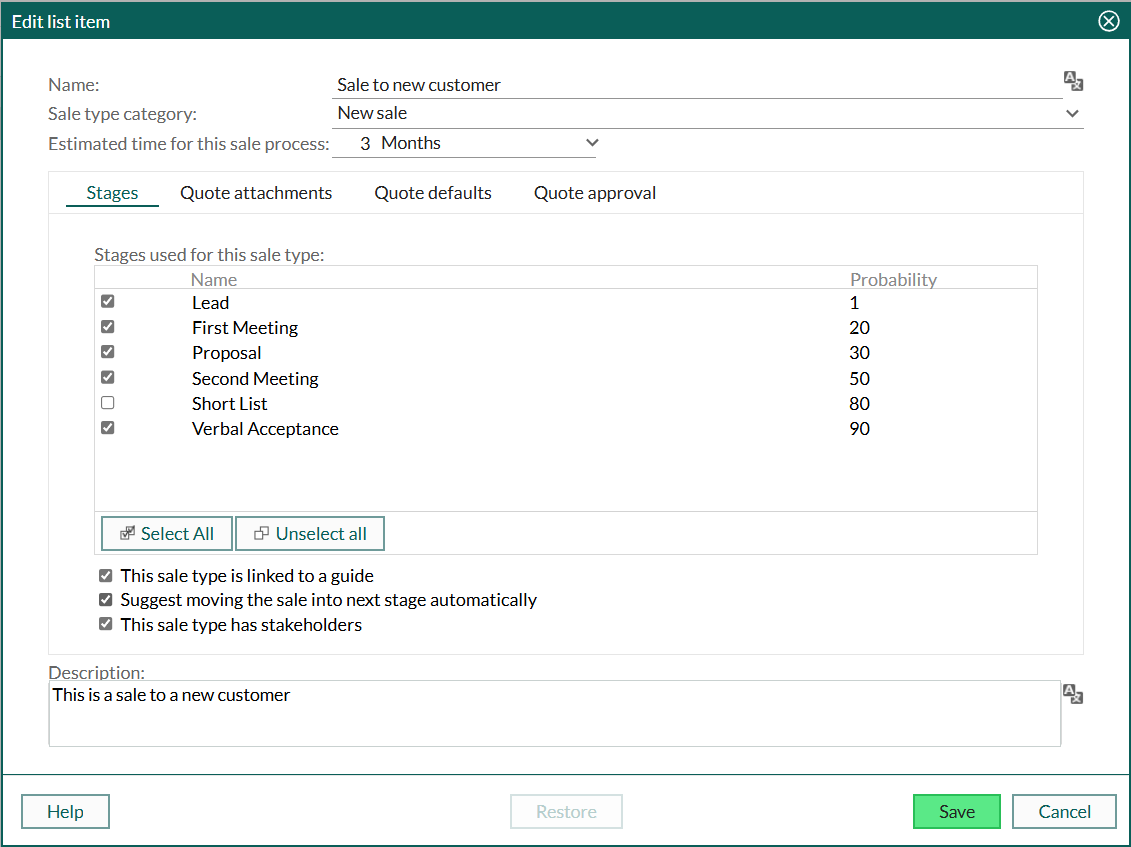
Enter a name for the sale type in the Name field. (Mandatory)
This name will appear in the Sale type field on the Sale card.
Select the required category for the sale type from the Sale type category list.
Tip
You can create new options in the Sale - Category (for sale type) list.
Specify the typical sales duration in the Estimated time for this sale process field (number of weeks, days or months).
This determines the default end date when creating a sale.
In the Stages tab, select the required stages in the Stages used for this sale type list.
Note
To link the sale type to a sales guide, select at least two stages.
(Optional) Check This sale type is linked to a guide to link the sale type to a sales guide.
(Optional) Check Suggest moving the sale into next stage automatically to prompt users to move to the next stage when all activities for the current stage are completed.
(Optional) Check This sale type has stakeholders to allow linking of stakeholders to sales of this type. (requires a Sales Premium license or the Growth plan)
Add a description of the sale type in the Description field, if needed.
For quote management, configure the fields in the Quote attachments, Quote defaults, and Quote approval tabs as described in Quote fields explained below. (requires a Sales Premium license or the Growth plan). These settings allow you to tailor quotes to match your organization's specific needs and processes.
Click Save to apply your changes or Cancel to discard them.
In the Stages used for this sale type list, check off the stages you want to include for the sale type. This step is optional, but to link the sale type to a sales guide, you should check at least two stages.
Quote fields explained
A quote belongs to a sale, and all sales have a sale type. In each sale type, you can define many of the properties of a quote, such as attachments, settings for approval, use of alternatives and templates.
In the Quote attachments tab, you can add documents to be sent to the customer along with a quote, such as product specifications or brochures.
Note
The documents must first be added as document templates in SuperOffice.
Add quote attachments
- Click Add.
- In the Find dialog, search for the documents you want to add.
- Select one or more documents and click OK. The documents are displayed in the Quote attachments tab.
- Select the documents you want to include in the Include column.
When creating a quote with this sale type, the selected documents are attached to the quote. However, they will not appear in the Activities section tab for the sale.
Edit or delete a sale type
Follow steps 1–2 in Add a sale type to access the Sale - Type, Stages, Quote list.
To edit:
- Double-click the required sale type to open the Edit list item dialog.
- Update the fields as needed and click Save.
To delete:
- Select the sale type in the list and click Delete.
Caution
Deleting a sale type also removes its link to stages and sales guides. Ensure it is not in active use before proceeding.
Restore a deleted sale type
If a sale type has been deleted, you can restore it from the Sale - Type, Stages, Quote list. However, restoring does not automatically reestablish any links between the restored item and related sale stages or guides. You must recreate these connections manually if needed.
Go to the Sale - Type, Stages, Quote list.
Check Show deleted items and headings in the footer. Deleted items appear strike-through in the Items tab.
Double-click the deleted item you want to restore. The Edit list item dialog opens.
Click Restore.
Update any necessary fields and click Save. The item is now active and will appear in the Items tab.