Create a new flow
Steps
- Select Marketing in the Navigator.
- Go to the Flows tab.
- If required, click Add folder to create a folder for the flow.
- Click the Flow button below Create new on the right side of the screen.
- In the Flow editor dialog, enter a short, descriptive Name.
- Fill in the fields as described below. Remember to click Save regularly to save your work. The flow will not be auto-saved.
- Define flow start trigger and filter.
- Add steps.
- Specify what happens when the flow finishes.
- Click Save when you are done.
Filling in flow fields
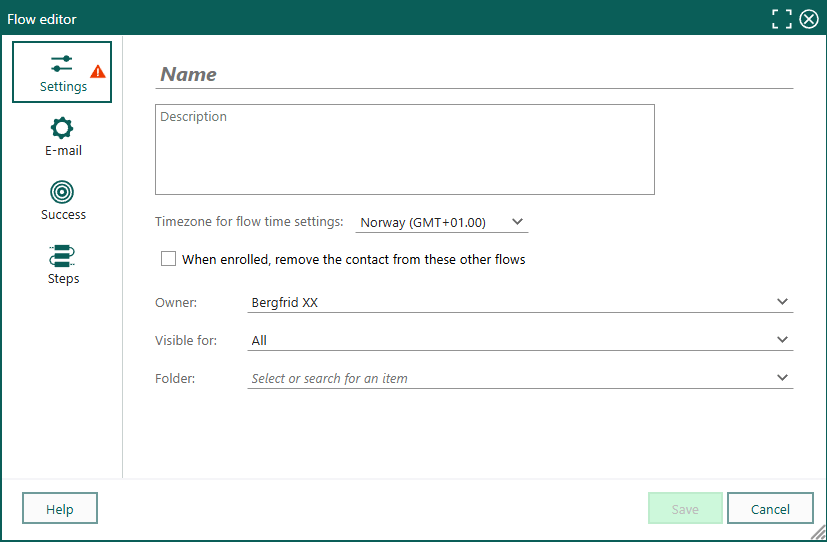
Settings (for flow)
| Setting | Description |
|---|---|
| Name | A descriptive label. |
| Description | Explain the purpose of the flow. This text is visible internally only. |
| Timezone | Required to limit the sending timeframe. |
| When enrolled, remove the contact from these other flows | If checked, the participant's status changes to Drop-out and they exit from the selected flows. Example: remove from Lead nurturing when enrolled into Onboarding flow. |
| Owner | Associate creating the flow |
| Visible for | Access to the flow (owner, owner's group, all). Level of access also controlled by functional rights. |
| Folder | The location of the flow. |
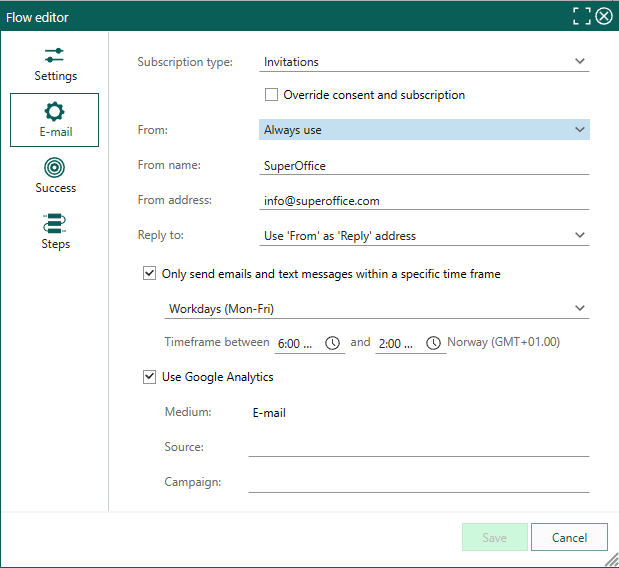
Email (settings)
Common email settings for all the emails in the flow. If you do not plan to send emails from this flow, you can skip entering these settings.
| Setting | Description |
|---|---|
| Subscription type | Set on flow level (instead of individually on each email step). Ensures all emails within a flow have the same subscription type. |
| From, from name, from address | Same sender on all email steps within the flow. In the From list, select Always use and enter the sender's email address in the field below to use the same sender for all mailings. You can also choose a sales contact or support contact as the sender, if one is defined for this recipient. Enter an email address to be used if no sales contact or support contact is available. If your admin has activated the global email validation preference, select the domain you want to send from in the drop-down list. |
| Reply to | The same options as above. In addition, you can select Use "From" as reply address. Any replies will then be sent to the sender. |
| Only send emails and SMS within a specific timeframe | Limits the sending timeframe. Participants wait in this step until the allowed timeframe starts. Select between Workday (Mon-Fri) and Weekday (Mon-Sun). Specify time. Requires that timezone is set. |
| Use Google Analytics | Enables Google Analytics tracking for all emails in a flow. When checked, you can set source and campaign. |
Tip
Timing affects email open rate and interaction. Use the timeframe setting to maximize reader interaction and to not disturb your subscribers during night-time.
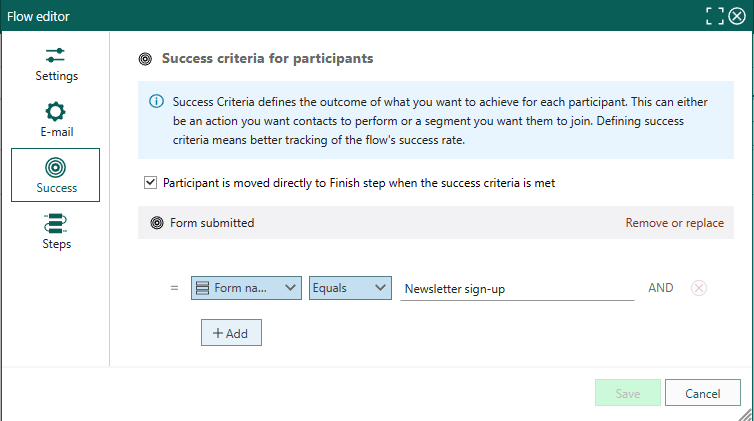
Success criteria (optional)
Success criteria define what success means for a flow.
Select Success criteria from the left menu.
Click Add success criteria and choose an option.
Optionally select Participant is moved directly to Finish step when the success criteria is met.
If checked: The participant's status changes to Finished with success and they exit from any other actions later in the flow.
If not checked: The participant's status remains Active and they continue to follow the flow. When they reach the Finish step, their status changes to Finished with success. Use this option if success rate is used primarily for statistics, and you want the participant to complete all the steps even if success is reached.
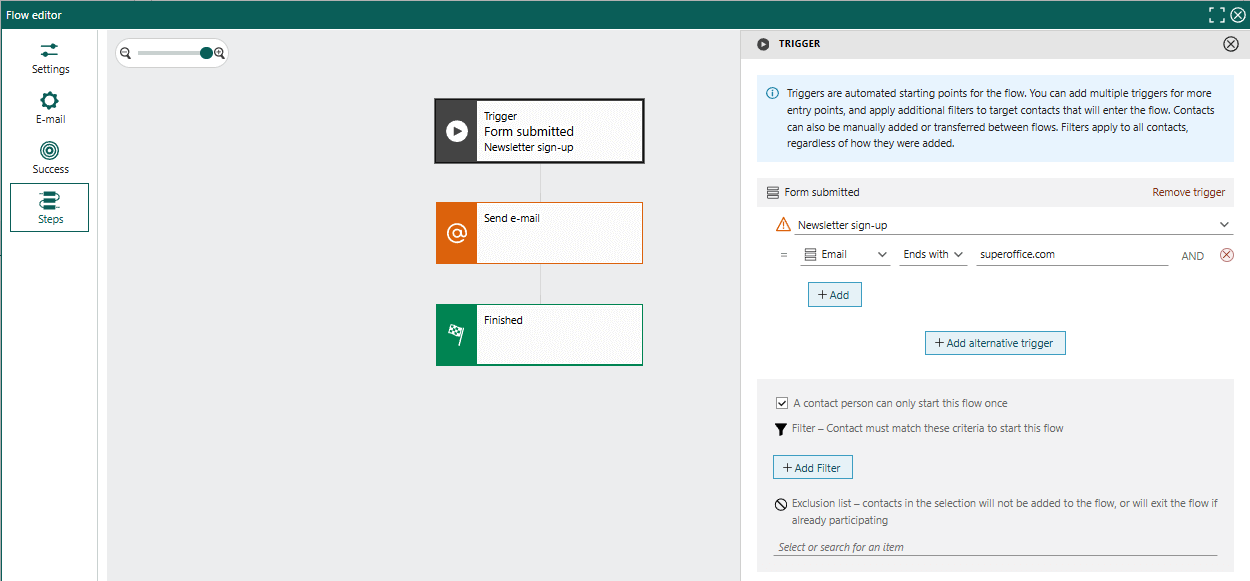
Define flow start trigger and filters
The Trigger step is automatically added as the starting point for any flow. It determines who the flow is relevant for. Triggers are only activated for running or paused flows.
Note
It is possible to create a flow without any automated trigger - by using the contact task menu or a selection task. We will discuss this special case in another topic.
- Select Steps from the left menu.
- Click the Trigger step in the flowchart.
- In the trigger settings on the right side, click Add trigger and choose an option.
- Enter the required settings for the selected trigger.
- Optionally, specify additional qualification criteria.
- Optionally select A contact person can only start this flow once. If a flow is triggered a second time on the same contact, this setting ensures they do not re-enrolled.
| Trigger | Description |
|---|---|
| Contact created | When a new contact is registered, independent of source (except import). |
| Contact update | When a contact is updated, independent of what is updated (except import and bulk update). |
| Sale created | When a sale is registered on the contact. |
| Sale sold | When a sale on the contact is set to sold. |
| Sale lost | When a sale on the contact is set to lost. |
| Added to project | When contact is added as project member. |
| Request created | When a request is created on the contact (independent of source). |
| Form submitted | When a form (submitted by a contact) is processed (a manual step could be involved before the contact ends up in the flow). |
| Link clicked | When a contact clicks a tracked link. |
Note:
- If you select form submitted or link clicked, be mindful of any warning icons. Forms and tracked links may also have associated actions.
- To include contacts created or updated by an import, you need to manually add imported contacts from the selection to a flow.
- When triggering on contact updated, we have access to the current values of contact fields. However, we do not have information about which field was updated or the previous value of a field before the update.
Add contact filter (optional)
Filters are additional rules applied to all suggested participants (automatically and manually added). Use the contact filter to select specific contacts for your flow. For example, set the filter to contact category = prospect to allow only prospects into the flow, not existing customers, who fill out a form on your website. This allows you to tailor content to different user groups.
Note
Filters apply only when identifying new flow participants. Any modifications made to the filter afterward do not impact participants already enrolled.
- Select the contact field you want to filter on.
- Select values for the criterion in the various fields on the line (similar to in the Find screen).
- Click Add to set additional criteria (adds a new line).
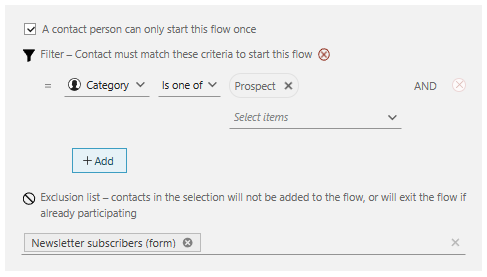
Exclusion list (optional)
The exclusion list prevents selected contacts from being added to the flow. Use a static selection to handle exceptions, such as:
- Prevent specific customers from receiving general mass emails.
- Send reminders, but not to those already signed up.
Add step
Select Steps from the left menu.
Chose a step and drag it to where you wish to add it in the flowchart.
The step menu changes to step settings. Available settings depend on the step's type.
- Send message
- Flow control
- Update participant
- Create activity
- Internal actions
Click the X in the step settings header to return to the step menu.
The first step
When you open the Steps tab for the first time, you will see something like this:
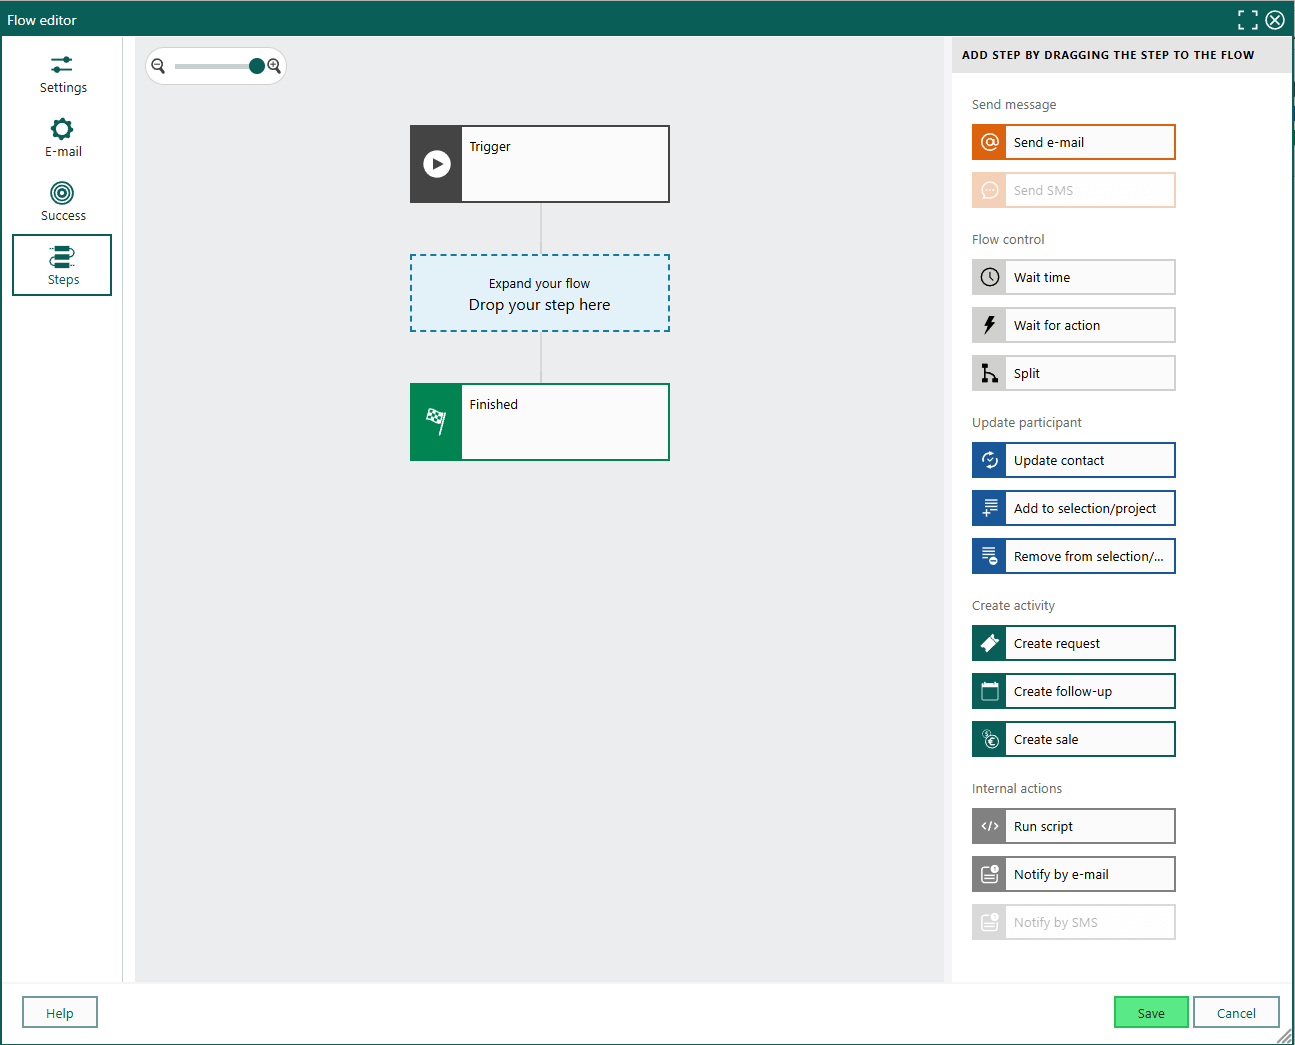
- A flowchart with a Trigger, a placeholder for adding a step, and a Finish step (in the center).
- A list of available step types (to the right).
Flow control
Most steps in a flow represent actions related to the participant, such as updating contact interests. However, flow-control steps are different; they involve timing and segmentation.
Without flow control, individuals would progress from one action to another until they either drop out or reach the end of the flow. For example, they might receive the entire onboarding program in a single day or receive all newsletters simultaneously.
Moreover, without flow control, everyone enrolled would follow the same sequence of steps. While this might be suitable for a simple flow, by setting conditions for subsequent actions, you can, for instance, send a newsletter in the contact's preferred language or send a feedback survey only to those who attended the webinar.
Options:
- Wait Time
- Wait for Action
- Split
Note
Participants are marked with a wait until timestamp when they reach a wait step. If the next step is an email or SMS, and a limited timeframe is specified in the email settings, the total waiting time might exceed what is set in the step.
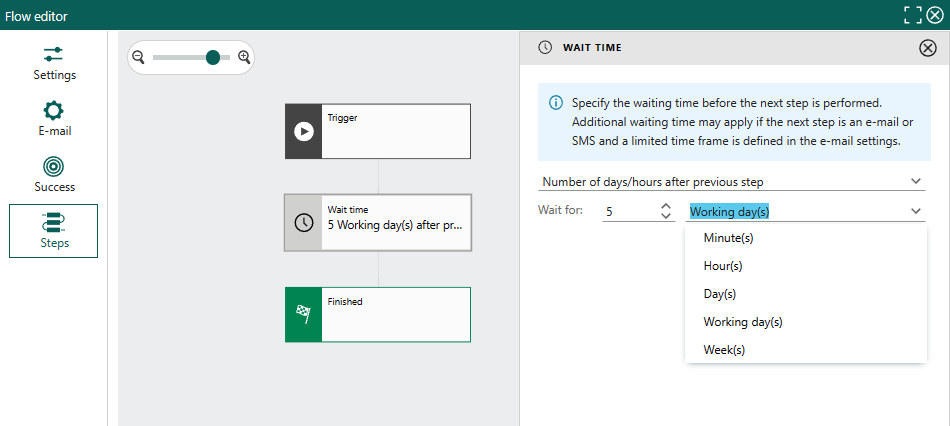
Wait time
Use a time-based waiting step to wait a specific amount of days before sending the next email/SMS, or to wait until a specific date for specific occasions or actions. For example, to send reminders 1 week, 1 day, and 1 hour before a webinar.
Drag the Wait time box from the step menu and drop it into an available slot in the flowchart.
Set the condition. Do one of the following:
- Select Number of days/hours after previous step and then select number and unit.
- Or, select Until specific date/time and then pick a date from the calendar.
Active flow participants remain at this step before proceeding to the next step according to the defined rule.
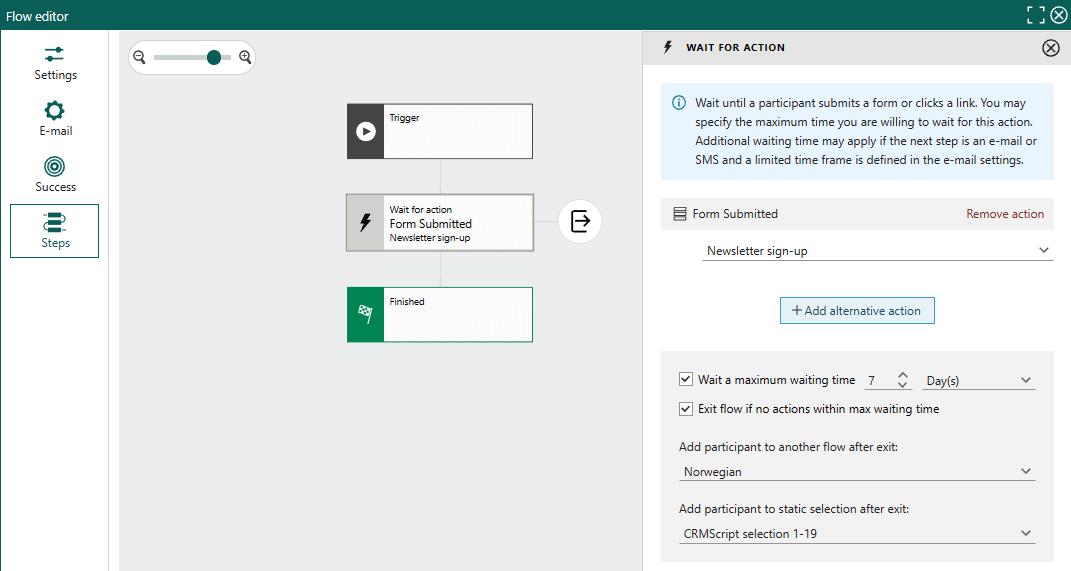
Wait for action
Use an action-based waiting step to wait for the participant to do something (submit a form or click a link).
Drag the Wait for action box from the step menu and drop it into an available slot in the flowchart.
Click Add action and select which action to wait for.
From the list, select the name of the link or form to wait for.
Specify how long you are willing to wait for any action (a timeout). The default maximum waiting time is 7 days. If you uncheck this setting, participants who do not respond will be stalled at this step indefinitely.
Optionally, select Exit flow if no actions within max waiting time. Participants who do not respond will leave the flow with the status Drop out. You may choose to move them to another flow and/or add them to a static selection.
Tip
You can wait for more than one action within a single step. The first-occurring action (form submission, link click, or timeout) moves the participant further down the flow. Simply repeat steps 2 and 3 above.
What happens now?
After designing a flow and saving it, the Flow editor closes, and the flow chart is shown in the View flow screen. The new flow has status Not running until a flow administrator manually starts it by toggling Running = true.