Set up a new activity monitor
Note
Activity monitors (SAINT) require a Sales Premium or Service Premium license or the Growth plan.
With an activity monitor, you easily see all the customers who need attention.
To create a status, you define its name and description, add at least one criterion, and optionally set a priority, default follow-up type, or image. The steps below show the full process.
Steps
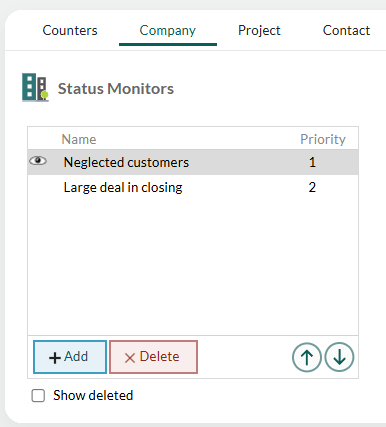
Open the SAINT screen in Settings and maintenance and select the Company, Contact, or Project tab.
Click Add below the Status monitors list.
In the dialog, complete these fields:
Name: Enter a descriptive name for the status you want to add. Optional: Click to add translations of the status name.
Description: Enter a clear description of the status and what action is required or recommended. You can also use template variables to tailor the text to the company, contact, or project.
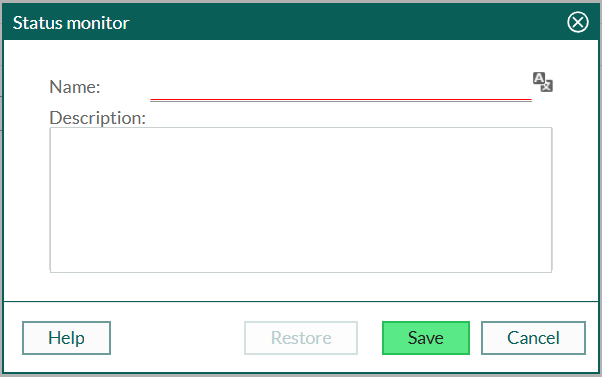
The name and description are displayed in SuperOffice CRM when the user hovers over the status image or opens the status dialog. You can later edit the description.
Click Save. Then select the new status in the list to continue with the setup.
Specify criteria for the status:
- Below the criteria list, select Add to insert a new criterion.
- Choose a criterion type, set the condition, and enter a value.

Each status must include at least one criterion. Repeat as needed to add more.
(Optional) Define a default follow-up type for the status in the Create follow-up tab.
(Optional) Select an image to visualize the status.
If there are several statuses in the list, set the priority to control which status image is displayed on the card. A company, contact, or project can match the criteria for multiple statuses, but only one image can be shown. Select a status and use the arrow buttons below the list to move it up or down.
When you are done, select Regenerate selected status monitor to activate the status.
Select an image for a status
You can add an image to be displayed on company, contact, or project cards that meet the status criteria. The image appears as a light watermark (40% transparency) so it does not obscure other content.
Adding an image is optional. It can help draw attention and symbolize the type of follow-up action you want users to take. If you only want to use the status for searches or selections, you can leave it without an image.
- In the status list, select the required status.
- On the right side of the screen, check Visualize to display the image.
- Select Change image.
- Do one of the following:
- Select one of the existing images from the Images list.
- Select Add, upload a file, enter a description, and select Save.
- Select OK to confirm.
You can use files of the following types: .jpg, .png, and .gif.
We recommend that you use an image size of 130 x 180 pixels. If the image is bigger than that, it is cropped on the bottom and the right edge.
Tip
Use simple, light-colored images that represent the status meaningfully. For example, a spider's web can symbolize inactivity.
Use template variables in descriptions
You can use template variables in the Description field to personalize the text shown in follow-ups or status dialogs. Variables are replaced with information from the company, contact, or project.
Example
A status could apply to companies that meet the following criteria:
- Category = Customer
- Last sale more than 2 months old
- Number of sales greater than 50
The text in the Description field could be:
"<name> has previously been a good customer, but we have not sold anything to them in 2 months. <cont> is the main contact for this customer and should get in touch with the customer soon by phone (<cpho>) or email (<mail>) to find out why."
In this example, the following template variables are used:
| Variable | Description |
|---|---|
| name | The name of the company |
| cont | The name of our contact for the company |
| cpho | The company's phone number |
| The company's email address |