Tutorial
To have control over what happens when data is retrieved and stored from a page in SuperOffice Web, you will need to create your own data handler.
What data handlers to be used on a page are defined in the page configuration files.
This is step 2 of the SaleForeignKey tutorial and builds on the datagrid user control we created in part 1. It demonstrates how to create our own data handler for adding more functionality to the Save button of the Sale page.
Create a DataHandler class
The first thing you need to do is to create a new class that inherits SuperOffice.CRM.Web.Data.SaleDataHandler.
If you take a look at the public methods you can override, you will see that there are methods for all the basic operations available to a SuperOffice page:
- New
- Load
- Save
- Delete
- ...
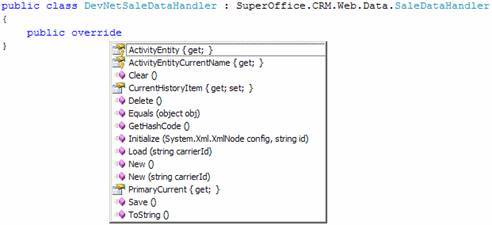
For this exercise, we will be using the Initialize and Save methods.
Declare the DataHandler
To let SuperOffice know about any of your own objects, you will need to define them in the SoObjectMapping.config file. The same goes for the new data handler:
<object type="IDataHandler"
        mappingname="DevNetSaleDataHandler"
        assemblyname="CustomizingSIXwebPart3"
        objectname="CustomizingSIXwebPart3.DevNetSaleDataHandler">
</object>
Use the DataHandler
To use the new data handler from the Sale page, we need to define it in the datahandlers section of the SoSalePage.config file. We will replace the existing data handler of type SaleDataHandler with our own:
<page id="SaleDialog">
  <title binding="resources">[SR_SDLG_CAPTION]</title>
  <data>
    <datahandlers>
      <datahandler id="EntityDataHandler" type="DevNetSaleDataHandler">
        <config>
          <completed-panelid>SalePanel</completed-panelid>
          <completed-cardid>SaleCard</completed-cardid>
        </config>
      </datahandler>
Add data carriers
We need to override the Initialize method to add more data carriers to the data handler.
The data carriers are, what the name implies, objects that hold any type of data. That could be just a simple data type like a string or an int, or a more complex one, like an array, generic list, or an instance of any class. In other words, the data carriers can carry any type of data. This data will be available to any of the controls that you add to the page that uses this data handler (when specified correctly in the page configuration file, mind you).
So if we continue with the 2 views that we added to the page, we will need a data carrier for each of the controls in these views.
public override void Initialize(System.Xml.XmlNode config, string id)
{
  _dataCarriers.Add("ForeignKeyDeviceOne", null);
  _dataCarriers.Add("ForeignKeyDeviceTwo", null);

  base.Initialize(config, id);
}
The data carriers of a data handler are stored in the generic dictionary _dataCarriers, coming from the DataHandlerBase class.
Add data sources
The data carriers will work as the data sources for one or several of the controls that you have defined on your page.
To have the 2 controls we added last time use these data carriers as their data sources, we need to specify that in the following way:
<control id="DevNetDeviceOne"
         type="DevNetSaleForeignKeys"
         width="100%" top="0px" left="0px" height="100%" position="absolute">
  <datasource>EntityDataHandler.ForeignKeyDeviceOne</datasource>
  <config>
    <ForeignKeyDeviceId>DeviceOne</ForeignKeyDeviceId>
  </config>
</control>

<control id="DevNetDeviceTwo"
         type="DevNetSaleForeignKeys"
         width="100%" top="0px" left="0px" height="100%" position="absolute">
  <datasource>EntityDataHandler.ForeignKeyDeviceTwo</datasource>
  <config>
    <ForeignKeyDeviceId>DeviceTwo</ForeignKeyDeviceId>
  </config>
</control>
The EntityDataHandler is an instance of the data handler that we defined in the section above, and the names of the data sources need to match the ones we used when adding the data carriers inside the Initialize method.
Note
EntityDataHandler matches the ID of the data handler defined for the page.
Populate the data sources
So far the data carriers of the new data handler (and thus the data sources of our 2 controls) do not contain anything. The next thing we want to do is to populate them with some data.
There is a sample project that you can download for this tutorial. Within this project, you will find a class: DevNetForeignKey, that holds properties for everything we need to create a new foreign key for the sale.
If you take a look at the code for the SaleForeignKeys user control, you see that there is a private property of type DevNetForeignKey defined and that this property is populated in the Page_Load method of the user control:
private DevNetForeignKey _fk = new DevNetForeignKey();

protected void Page_Load(object sender, EventArgs e)
{
  // Get current sale ID
  _saleId = SuperStateManager.GetCurrent("sale").Id;
  if (_saleId > 0 && !String.IsNullOrEmpty(_fkDeviceId))
  {
    _fk.DeviceId = _fkDeviceId;
    _fk.RecordId = _saleId;
    // Get all foreign keys for current sale
    GetList();
  }
}
To populate the data source of the user control, we need to override the UpdateDataSource method, and set the DataSource of the base object to whatever we want it to be. In this case, we want to set it to the just mentioned instance of the DevNetForeignKey class:
public override void UpdateDataSource()
{
    base.DataSource = _fk;
    base.UpdateDataSource();
}
The UpdateDataSource method of the base class needs to be called after you set the DataSource. It is called after Page_Load, so the DataSource will contain the object with the properties set from the Page_Load.
In addition to the data source of the user control now having an object assigned to it, the data carrier of the data handler will have access to the same object.
Use the data carriers when saving
The final goal of this exercise was to add new Foreign Keys to the current Sale. To add functionality to what happens when pressing the Save button on the Sale page, we need to override the Save method in the data handler:
public override object Save()
{
  // Save the sale
  base.Save();
  SaleEntity saleEntity = (SaleEntity)_dataCarriers["SaleEntity"];
  if (saleEntity.SaleId > 0)
  {
    // Save foreign keys
    DevNetForeignKey devNetFkOne = (DevNetForeignKey)_dataCarriers["ForeignKeyDeviceOne"];
    DevNetForeignKey devNetFkTwo = (DevNetForeignKey)_dataCarriers["ForeignKeyDeviceTwo"];
    SaveForeignKey(devNetFkOne, saleEntity);
    SaveForeignKey(devNetFkTwo, saleEntity);
  }
}
In the Save method, we let the Sale page do its thing first by calling the base Save method. The data handler will implicitly contain a data carrier holding whatever entity you are working on – in this case, a SaleEntity. If you were creating a new sale, the SaleEntity would have a value for SaleId after the base Save had completed.
The next thing we do is to use the two data carriers that we added to create two new foreign keys to the sale.
The foreign keys will simply contain a key consisting of the current date and time, and the value will be the title and amount of the sale (see the DevNetForeignKey class in the project). So basically, it would be a log of changes made to the title and amount of a Sale.
The actual saving of the foreign keys is done in the SaveForeignKey method of the data handler, which uses the Services layer to add a new foreign key.
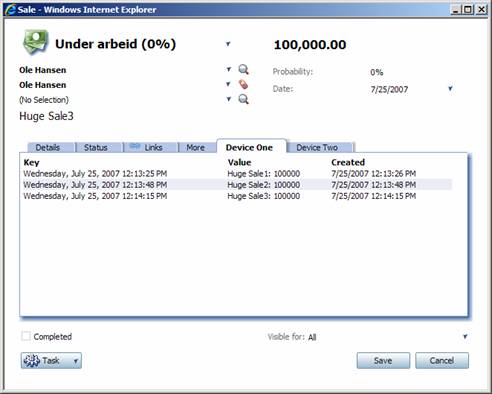
Here is the result of what we have gone through in this tutorial:
Next step
In part 3 of this tutorial we will create a custom MDO control.