Manage bounces
There are many reasons why email addresses bounce. Your contacts change jobs, an email addressed was misspelled, and even temporary faults in the customer's infrastructure are the typical reasons.
The first few times you sent out your mailing, you might get a large number of bounced emails. This is good news, because it means you can update every email address that is misspelled or no longer in use. Updating blocked email addresses will help increase the success rate of your future mailings.
You can manage bounces and blocked emails for individual mailings as well as for ALL mailings.
Why are emails returned?
Emails may be returned due to email address errors, spam filters, Internet problems or inboxes being full.
- Temporary problems: delivery delays, email server temporarily unavailable
- Permanent problems: wrong address, unknown domain.
Temporarily failing email addresses are not blocked, and they are not skipped in the next mailing.
Note
To prevent misspelled or invalid email addresses, SuperOffice validates email addresses received through Chat and Forms. The validation is performed using DNS lookup and controlling basic email syntax.
There are two types of bounces:
A hard bounce is when your mailing cannot be delivered permanently, because the email address does not exist, the domain does not exist (anymore), or the recipient's email server has blocked the delivery. Updating the email address will solve the problem.
A soft bounce occurs when there is a temporary delivery issue. SuperOffice CRM will try to send the mailing again several times to deliver it when an email bounces. Only when the email cannot be delivered after several times, it will be registered as a hard bounce.
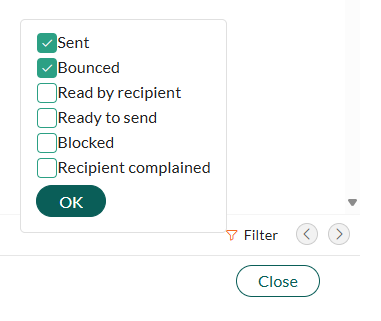
Use the filter buttons (Sent, Bounced, and Opened) to filter you recipients list. After you have selected all contacts where the mailing bounced, you can gather them in a selection or project using the action menu button in the bottom-left corner.

To fix a single email address
- Select the email in the list and click Open in the side-panel to edit the contact.
- Go to the Details tab.
- A warning icon () next to the email address indicates a problem. Hold the mouse-pointer over the icon to view the cause of the problem.
Tip
Click a column to access sorting and grouping functions.
Blocked email addresses
Email addresses that have failed due to permanent errors or bounced repeatedly are automatically blocked. Blocked addresses are skipped in all future mailings to protect your sender reputation.
By default, an email address is blocked after 5 consecutive bounces. This threshold defines what is considered too many bounces. It helps identify unreliable addresses that consistently fail to receive mailings. You can adjust this limit in the global preference Number of accepted bounces before email address is disabled in Settings and maintenance.
All blocked email addresses from all mailings are archived in the Blocked email addresses tab. This tab provides an excellent overview of email addresses that must be cleaned.
Tip
Click a column to access sorting and grouping functions.
Bounce options
To handle multiple email addresses, you have options in the Actions button.
Export
- Select the email addresses you want to export.
- Select Actions > Export.
- Select an export format. The export file displays in the bottom of you browser. It can also be found in you downloads folder.
Add to new selection
- Select the email addresses you want to add to a new selection.
- Select Actions > Add to new selection.
- Enter the name of the new selection and click OK. A new static selection is created with the selected email addresses.
Add to new project
- Select the email addresses you want to add to a new project.
- Select Actions > Add to new project.
- Enter the name of the new project and click OK. A new project is created with the selected email addresses.
Add to existing selection
- Select the email addresses you want to add to an existing selection.
- Select Actions > Add to existing selection.
- Start typing in the search field to find the relevant selection.
- In the list of results, click the selection you want to use.
- Click OK. The selected email addresses are added to the selection.
Add to existing project
- Select the email addresses you want to add to an existing project.
- Select Actions > Add to existing project.
- Start typing in the search field to find the relevant project.
- In the list of results, click the project you want to use.
- Click OK. The selected email addresses are added to the project
Delete selected email addresses
Use this option to permanently delete email addresses from the database.
- Select the email addresses you want to delete.
- Select Actions > Delete selected email addresses.
- Click OK to confirm.
Clear bounce-flag
Use this option to remove email addresses from the list, so they can be used in mailings. This may be relevant if bounces are due to wrong configuration or temporary technical reasons, or if you know that these email addresses are correct and want to try sending a second time.
- Select the email addresses that you want to clear of bounce-flags.
- Select Actions > Clear bounce-flag.
- Click OK to confirm.
Set as former employee
Use this option to set a contact as a former employee.
- Select the email addresses you want to delete.
- Select Actions > Set as former employee.
- Click OK to confirm.