Look at recipient list after the mailing
After your mailing is sent, it is always exciting to see how well your mailing performed. It is also a great opportunity to check and improve the quality of the information registered in your database. The number of bounced emails, especially, is a key indicator.
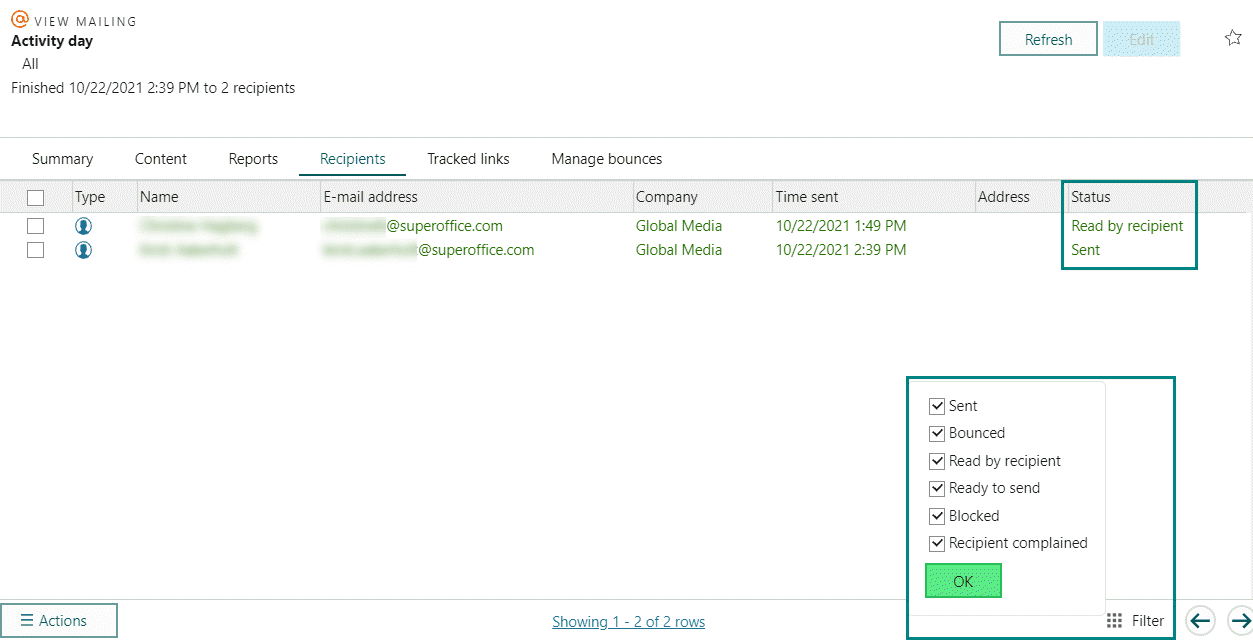
After the mailing is sent, SuperOffice Marketing collects data about the status of each sent email. In the Recipients tab, you can view the status for each recipient of the mailing. You can also filter the list and export the results to selections and projects for further processing.

Steps
Click the mailing in the Mailings tab.
In the View mailing screen, click the Recipients tab.
The list shows the 100 first recipients. Click to show the next 100.
Filter the list by using the checkboxes at the bottom of the list.
By default all filters are active to show all recipients. Uncheck a filter checkbox to deactivate the filter. Several filters can be combined.
Use the checkboxes in the left column to select all or specific recipients.
Click the Actions menu button. Here you have the following options:
- Export the selected recipients to an Excel, HTML, or text file.
- Add the selected recipients to a new or existing selection or project.
- Resend the mailing to the selected recipients.
Click Close to close the View mailing screen.
If the status is Ready to send, you do not have to do anything. SuperOffice will send your mailing to the recipients. The status change to Sent after this is done.
Filters
Sent: Activate this filter to show all recipients the mailing was sent to.
Bounced: Activate this filter to show all recipients for whom the mailing was returned undelivered. This may be due to email address errors, spam filters, Internet problems or inboxes being full.
Read by recipient: Activate this filter to show all recipients who opened/read the mailing.
Ready to send: Activate this filter to show all recipients to whom the mailing has not been sent yet.
Blocked: Activate this filter to show the following recipients:
- Recipient who have not given their consent to being contacted
- Duplicate recipients
- Recipients without a subscription
Recipient complained: Activate this filter to show recipients who reported the mailing as spam/junk mail.
If the status is Ready to send, you do not have to do anything. SuperOffice will send your mailing to the recipients. The status will be changed to Sent after this is done.
Add recipients to selections or projects
Using the Action button you can add recipients and clickers to a selection or project.
Note
Only contacts already registered in the SuperOffice database will be added to the selection or project. A contact icon () in the Type column indicates that a contact is registered in the SuperOffice database. Recipients imported from external lists will typically not be registered.
Add clickers to a new selection or project
- Select the relevant contacts in the list.
- Click the Action button.
- Click Add to existing selection or Add to existing project.
- Start writing the name of the selection or project to search.
- Click the selection or project in the list.
- Click OK.
Add clickers to an existing selection or project
- Select the relevant contacts in the list.
- Click the Action menu button.
- Click Add to new selection or Add to new project.
- Write the name of the new selection or project.
- Click OK.