Configure SuperOffice REST WebAPI
SuperOffice REST WebAPI services are available from version 8.1.
Introduction
Representational State Transfer (REST) is an architectural pattern penned by Roy Fielding for creating an HTTP-based API. There's no shortage of articles online that discuss what REST is, how it's been interpreted and how it's been implemented on various platforms. That will not be discussed here. This section will focus primarily on how to setup SuperOffice REST in IIS and perform a simple test.
Configuration
Before any request are sent to the web server, NetServer must be configured to support REST requests and IIS must be configured to handle all of the HTTP verbs.
Configure NetServer
In the current SuperOffice installations, NetServer REST services are switched on by default and may not need to be configured. However, for the sake of knowledge, these settings are a feature that must be toggled on by adding or changing the settings in the configuration file.
Ensure the following entries in SuperOffice sectionGroup element: the WebApi section.
SuperOffice sectionGroup in web.config:
<sectionGroup name="SuperOffice">
  <!-- possibly more sections above -->
  <section name="WebApi" type="System.Configuration.NameValueSectionHandler, System, Version=1.0.5000.0, Culture=neutral, PublicKeyToken=b77a5c561934e089" />
  <!-- possibly more sections below -->
</sectionGroup>
Locate or add the WebApi element and set one or both keys to true to enable: AuthorizeWithUsername and AuthorizeWithTicket.
SuperOffice element in web.config:
<SuperOffice>
  <!--more sections above -->
  <WebApi>
    <add key="AuthorizeWithUsername" value="true" />
    <add key="AuthorizeWithTicket" value="true" />
  </WebApi>
  <!--more sections below -->
</SuperOffice>
Now that the NetServer configuration is complete, let's configure IIS.
Configure HTTP Action Verbs (IIS)
In IIS, navigate to the SuperOffice web client application, or NetServer if installed standalone, and select it. Then, in **Features View, double-click Handler Mappings.
In the Handler Mappings view, locate and double-click the ExtensionlessUrlHandler-Integrated-4.0 list item. The Edit Managed Handler dialog will appear. Click the Request Restrictions button in the Edit Managed Handler dialog to open the Request Restrictions dialog.
Click to view the Verbs tab in the Request Restrictions dialog. Next click the All Verbs option, then click OK to close the dialog. Close the remaining dialogs and close to exit the IIS manager.
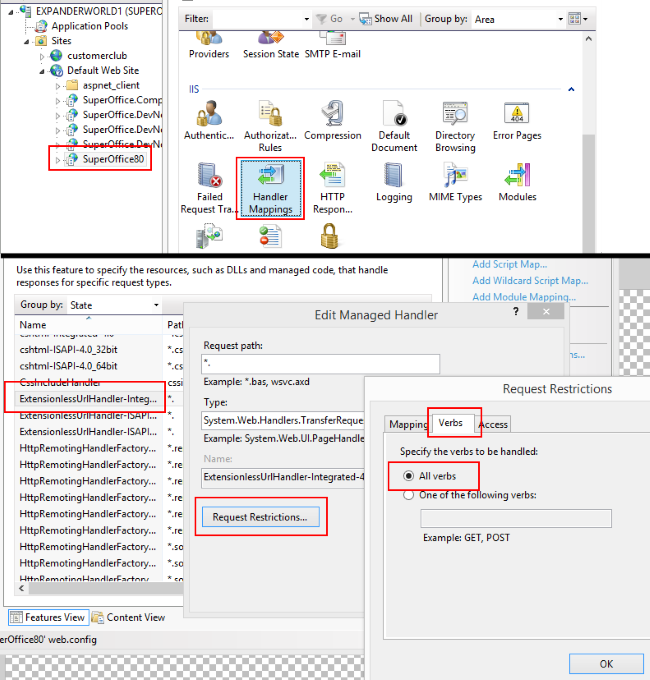
IIS Manager Handler Mappings:

IIS is now configured to access and process all request verbs, and therefore permit requests to create, read, update and delete via SuperOffice REST APIs.
Configure Basic Authentication (IIS)
While API authentication is discussed below, it's important to understand how to configure IIS if you plan on using basic authentication.
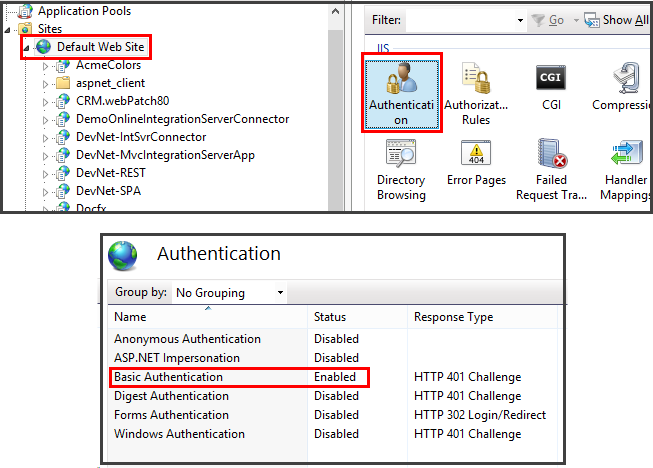
To enable Basic Authentication for REST API, first enable basic authentication on the website root. Do this by selecting the root website, then double-click the Authentication icon in the Features View pane. With the Authentication panel shown, right-click the Basic Authentication option and set the status to Enabled.
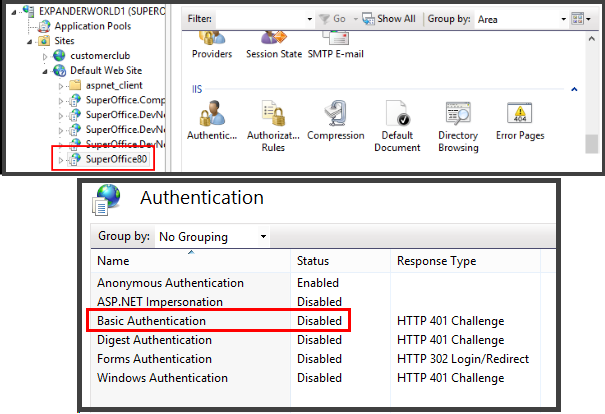
Next, disable Basic Authentication on the SuperOffice web application. Select the SuperOffice web application under the root website, then double-click the Authentication icon. In the Authentication panel, if the Basic Authentication status is Enabled, right-click Basic Authentication and select Disable.
With Basic Authentication configured this way, any valid SuperOffice user can navigate to the REST URLs and invoke a request. To test these settings, navigate to the application's URL and attempt to get the contact where contact ID equals 1. Do that by navigating in a browser to http://superoffice80/api/v1/contact/1 and this should result in a Credentials dialog prompting for a username and password. Any valid SuperOffice username works.
Integrated with Active Directory
SuperOffice Users
To integrate with Active Directory, you need to set up your SuperOffice users as Active Directory users.
- web.config must define and configure the ActiveDirectoryCredentialPlugin section.
- SuperOffice users must be linked to Active Directory users.
SuperOffice web.config
You must explicitly enable the authentication methods you want to use in the web.config file.
<WebApi>
  <add key="AuthorizeWithImplicit" value="true" />
</WebApi>
Note
AuthorizeWithImplicit must be true; otherwise, the Active Directory authentication method will not work. It adds the WWW-Authenticate: Negotiate header that kicks off Windows authentication.
IIS configuration
Open the IIS Configuration tool and select the SuperOffice application.
In IIS, navigate to the application hosting SuperOffice web client.
Enable Windows Authentication, and disable the others.

Click Advanced Settings to enable Kernel-mode authentication.
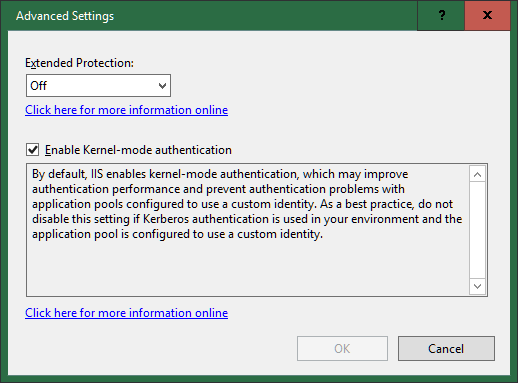
Click Providers to ensure that Negotiate is the first enabled provider.
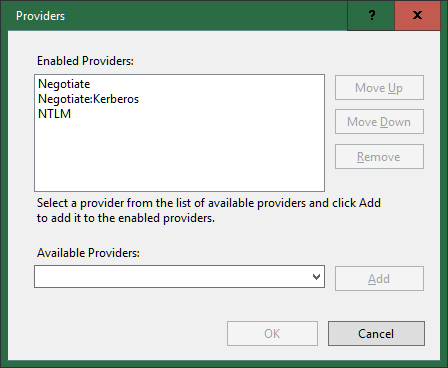
Your SuperOffice and WebAPI are now accessible without logging in.
The HTTP.sys kernel driver will stop unauthenticated requests before they reach ASP.net and send back an ActiveDirectory response that the browser can use to log in using its windows identity.
Accessing /api/v1/user/currentPrincipal via Chrome or Edge should automatically log you in, and return the current user's info.
Hello WebAPI
So now we can make our first request to the API endpoint:
GET https://{{superoffice_url}}/api
Accept: application/json; charset=utf-8
This will request the API overview. If you use a browser to open http://crm.example.com/superoffice/api you will get a webpage that says:
HTTP/1.1 200 OK
Cache-Control: no-cache
Pragma: no-cache
Transfer-Encoding: chunked
Content-Type: application/json; charset=utf-8
Content-Encoding: gzip
Expires: -1
Vary: Accept-Encoding
Strict-Transport-Security: max-age=63072000; includeSubDomains; preload
Date: {todays date}

{
  "v1": "{{superoffice_url}}/api/v1/",
  "NetServerVersion": "{current_version}",
  "NetServerAssembly": "{current_assembly_version}",
  "NetServerDate": "{build_date}",
  "NetServerLabel": "{build_release_version}",
  "NetServer": "SuperOffice {version} NetServer {version info}",
  "Services": "Services??",
  "ServicesCurrent": "Services??",
  "Version": "v1"
}
If you use POSTMAN or a similar tool, you will get back some JSON that contains the same information instead of an HTML page.
This gets us some metadata about the API without logging in, and an indication that the API is up and running correctly.
Conclusion
SuperOffice REST services add another API surface to the NetServer real estate. To learn more about SuperOffice REST services, see the [web services APIs].