Setting up a Reverse proxy on IIS8
Our recommended deployment scenario uses a Reverse proxy on the DMZ server to access the internal server where SuperOffice Sales and Service are installed.
Note
SuperOffice 8.1 requires that our clients are located on the same domain as seen from the user's browser. This means service.myorganization.com and crm.myorganization.com from version 8.1 must be socrm.myorganization.com/service and socrm.myorganization.com/sales. It is not required to put Service in a subfolder, but it makes generating the URL rewrite rules a lot easier.
Platform: Windows Server 2012 R2 Standard
Preparations:
- An internal site installed in the Internal Server Network
- A public site in the DMZ available from the Internet (see Scenario #2)
Reverse Proxy on DMZ server
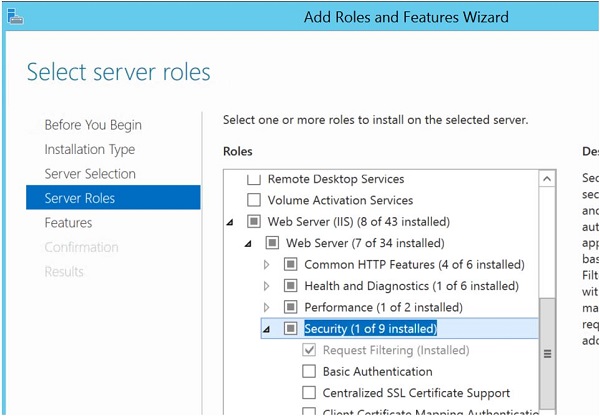
Install Web Server (IIS) using the Add roles and Features Wizard from the Server Manager Dashboard.
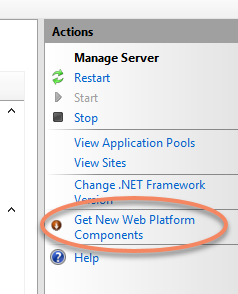
Open the IIS Manager on the server level and on the right side under Actions select Get New Web Platform Components.
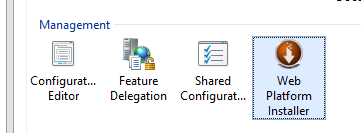
Download and install the Web Platform Installer, which is an extension to the IIS Manager console.
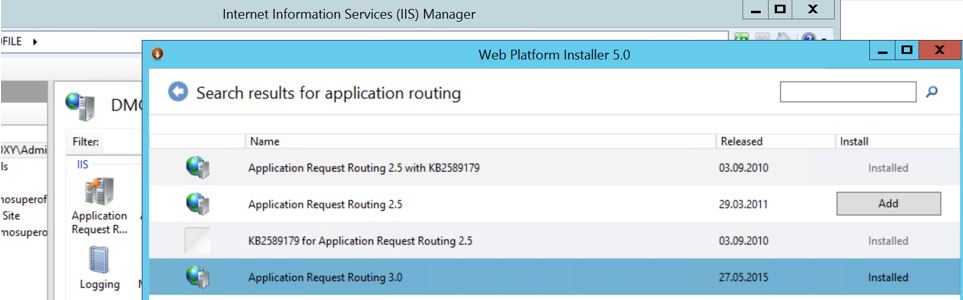
Run it, select the Products tab and find Application Request Routing 3.0. This will allow the server to function as a reverse proxy, proxying requests coming from users to the NetServer.
Changes in Reverse proxy
Open up Application Request Routing Cache on the root node of the IIS server.
Click Server proxy settings on the right menu.
Uncheck Reverse rewrite host in response headers.
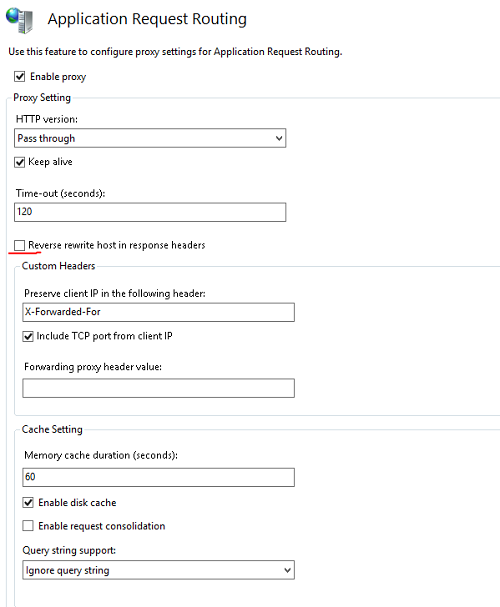
Click Apply.
From 8.1 we require our products (Sales and Service) to be installed on the same domain since authentication is only done by the Sales web client.
To set up support for your SuperOffice installation, we recommend setting up one site for SuperOffice Service and SuperOffice Sales web client. The site is just an empty shell, which is not serving any content itself but is only redirecting requests to the correct place. To illustrate, a potential setup could have SuperOffice Service at socrm.myorganization.com/service and SuperOffice CRM at socrm.myorganization.com/sales.
Set up the site as follows:
- Right-click the Sites folder in the Connections pane in IIS manager and click Add website.
- Give the site a descriptive name. If the site will redirect SuperOffice Service requests, name it SuperOffice Service.
- Set the physical path to an empty folder, for instance, create a folder at C:\SuperOfficeService.
- Leave the binding type to HTTP for now and choose the correct IP address you want the webserver to listen on.
- Enter the hostname that the site should respond to, for instance,
socrm.myorganization.com
For each site, we need to set up some URL-rewrite rules so that the requests hitting our proxy server will be redirected to the correct place. If both clients are installed on the same IIS site internally then we only need one rule set up.
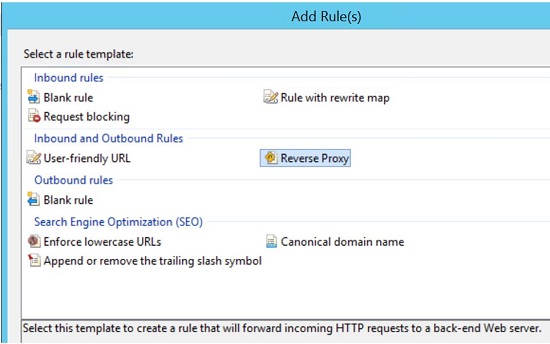
Select the site and click URL Rewrite.

Select Add Rule(s) from the action pane on the right and add a Reverse Proxy rule.
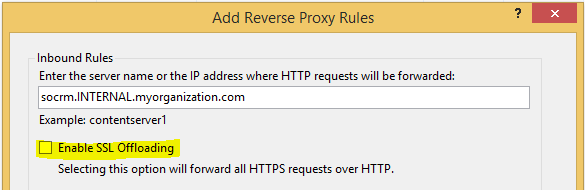
In the Add Reverse Proxy Rules dialog, enter the DNS hostname of the internal server that is hosting SuperOffice. For instance, when setting up proxy rules for SuperOffice where both Sale and Service are installed internally on the same site socrm.INTERNAL.myorganization.com, then add socrm.INTERNAL.myorganization.com in the Server name of the rule. Uncheck the Enable SSL Offloading box and click OK.
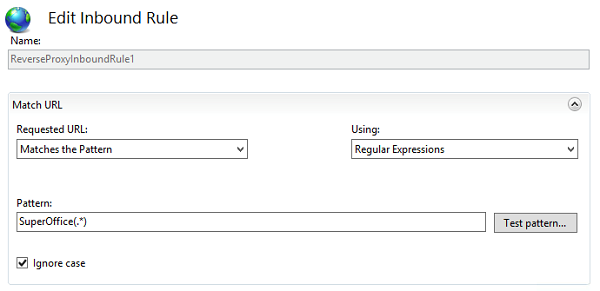
If you only want to expose Sales and this is installed on the internal server under socrm.INTERNAL.myorganization.com/SuperOffice then we need to modify the inbound rule to look like the following:
Make sure that the proxy server can reach the internal servers and that it can resolve the DNS names that have been defined in the URL-rewrite rules.
The final rules should look something like this:

Note that the CRM rule does not allow HTTPS in the Action URL, this should be changed when setting up HTTPS for the servers, but for now, we can keep it at HTTP. Try browsing to the proxy server and to see if the rules are working properly. In my case, I would browse to the following URLs. Note that only HTTP has been set up:
http://socrm.myorganization.com/Sales
http://socrm.myorganization.com/Service/scripts/rms.fcgi
Add an outbound rule for the location header:
Add rule
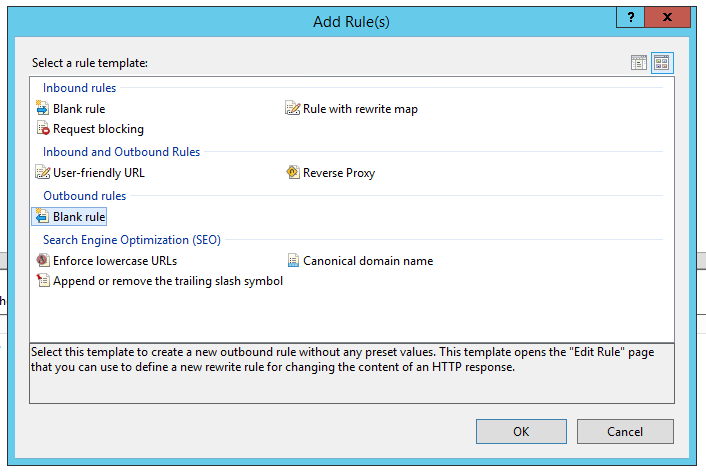
Enter the following values:
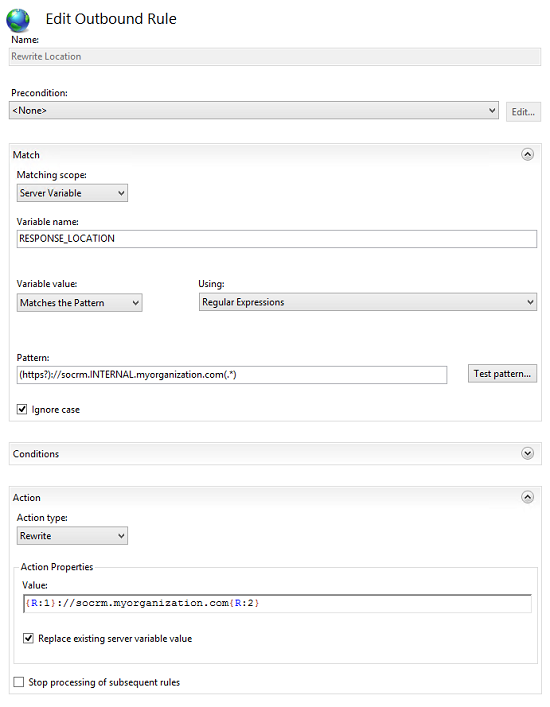
- Name: Rewrite location
- Matching scope: Server variable
- Variable name: RESPONSE_LOCATION
- Pattern: (https?)://socrm.INTERNAL.myorganization.com(.*)
- Action: Rewrite
- Action properties: {R:1}://socrm.myorganization.com{R:2}
- Replace existing server variable must be checked
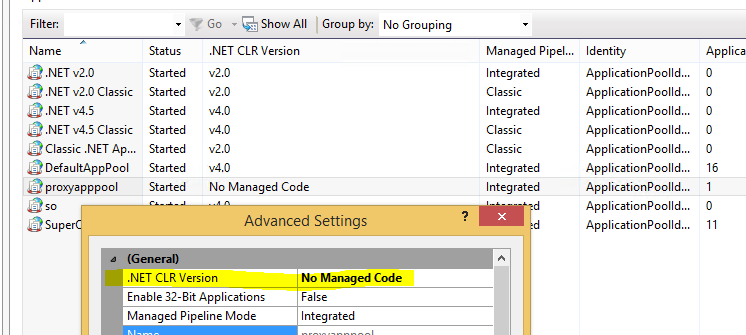
Application pool settings
To make sure the WCF services are working correctly, you have to change some settings in the application pool. Right-click on the application pool and click on advanced settings. Under the category General you will find an option called .NET CLR Version. Change this option to No Managed Code in the drop-down menu.
No Managed Code
This option is for applications that do not use the .NET framework. Since the App Pool is a proxy to forward requests, the .NET runtime is not needed.
Web Tools
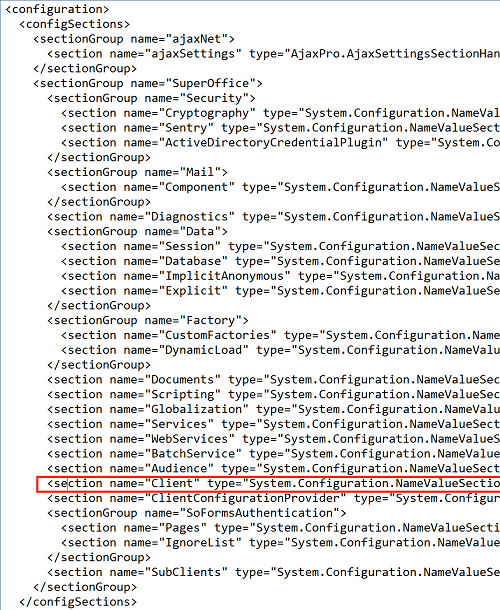
To make Web Tools go through our proxy, we need to edit the web.config file of SuperOffice. In the <client> section, change the key UrlHostOverride to point to the hostname of the proxy server.

<add key="UrlSchemeOverride" value="http" />
<add key="UrlPortOverride" value="80" />
<add key="UrlHostOverride" value="socrm.myorganization.com" />
When enabling HTTPS, the value UrlPortOverride should be changed to 443 and UrlSchemeOverride should be changed to HTTPS.
Note
To make HTTPS work with Web Tools, the certificate used on the proxy server needs to be a valid, signed certificate, otherwise the Web Tools client will not be able to make a connection. Self-signed certificates won't work.
Make sure that the Client section in the web.config file is defined at the top of the file inside the <configSections> directive. The screenshots below show what the file should look like.

If clients are unable to download the web tools client, then you need to allow communication to https://www3.superoffice.com which is our Download service.
WebAPI
If your installation is protected from the internet by a reverse proxy, then the URLs generated by the WebAPI will be wrong (since the API does not know about the proxy).
In the web.config file you can specify the hostname to use instead of the internal server's name:
<SuperOffice>
  <Client>
    <add key="UrlSchemeOverride" value="https" />
    <add key="UrlPortOverride" value="443" />
    <add key="UrlHostOverride" value="crm.example.com"/>
  </Client>
</SuperOffice>
This will replace the hostname used in the links generated by the WebAPI with the overrides so that clients will see links that match the hostname that they see (the hostname of the proxy), rather than the internal hostname.
Note
The path portion is not mapped or changed.
Changes in Service
The URLs for the Internal and External URL must be updated to match the external address.
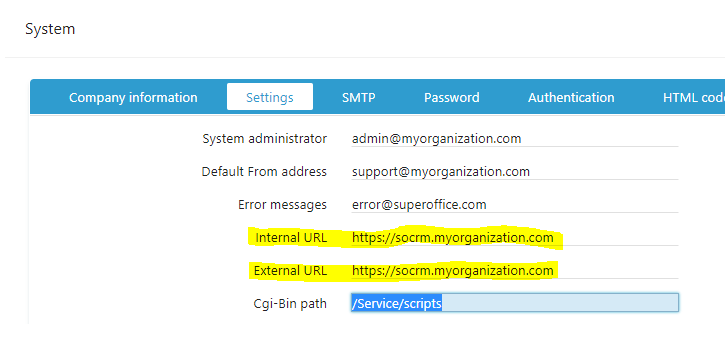
Or update directly in the database table called <prefix>.config - fields cgi_url and cgi_url_internal.
Note - running on HTTPS
SuperOffice Service may not use NetServer web services running on HTTPS, this means you have to use an nsEndPoint address in the Service config file that uses HTTP and not HTTPS
[More info](javascript:WebForm_DoPostBackWithOptions(new WebForm_PostBackOptions("ctl00$plhFullWidthContentArea$propMainBody$ctl00$ctl38$ctl00$btnBanner", "", false, "", "javascript:%20return%20false;", false, true)) "More info")
Note regarding upgrades
To make sure later updates of Service runs successfully on the Internal web server, add a new registry key below HKey_Locale_MachineSoftware\Wow6432Node\SuperOffice Customer Service on the Internal webserver. This key should have the same string values as the internal site (basePath and instanceId), but the name of the key should be the same as the external website (proxy URL).

Now when upgrading you will provide the external URL when it asks for the domain and it will not fail when it comes to the point where it should start EjScheduler here:

Using more than one internal webserver to redirect traffic to
To be able to redirect to several internal web services you need to add the following section to the web.config file in the <configuration> section on the proxy server.
<system.serviceModel>
  <serviceHostingEnvironment aspNetCompatibilityEnabled="true" multipleSiteBindingsEnabled="true" />
</system.serviceModel>
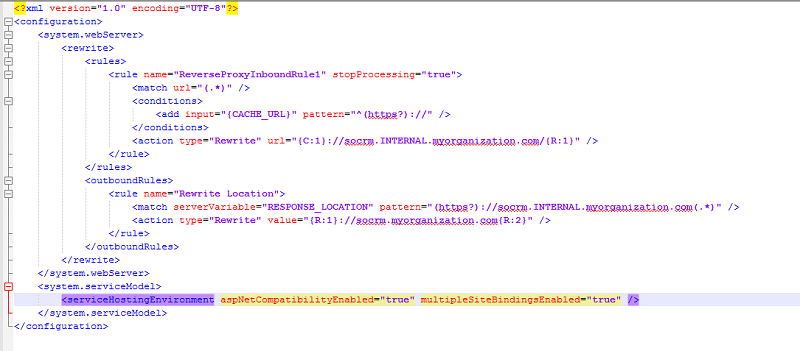
Multiple site bindings enable multiple base addresses (enables the proxy to forward to multiple hosts).
Exposing just the external customer parts of Service to the Internet
If you just want to expose the Customer center, Chat, or Mailings to the Internet, then you may only expose socrm.myorganization.com/service/scripts/customer.exe/fcgi. In addition, the static files need to be exposed as well. We do not have a strict categorization on which files need to be exposed and we do not see a security issue with exposing them, so our recommendation is to expose all static Service files (/JavaScript, /graphics, and /css with sub-folders). These files are the static files we distribute through our installers and no customer-specific files are located in these folders.