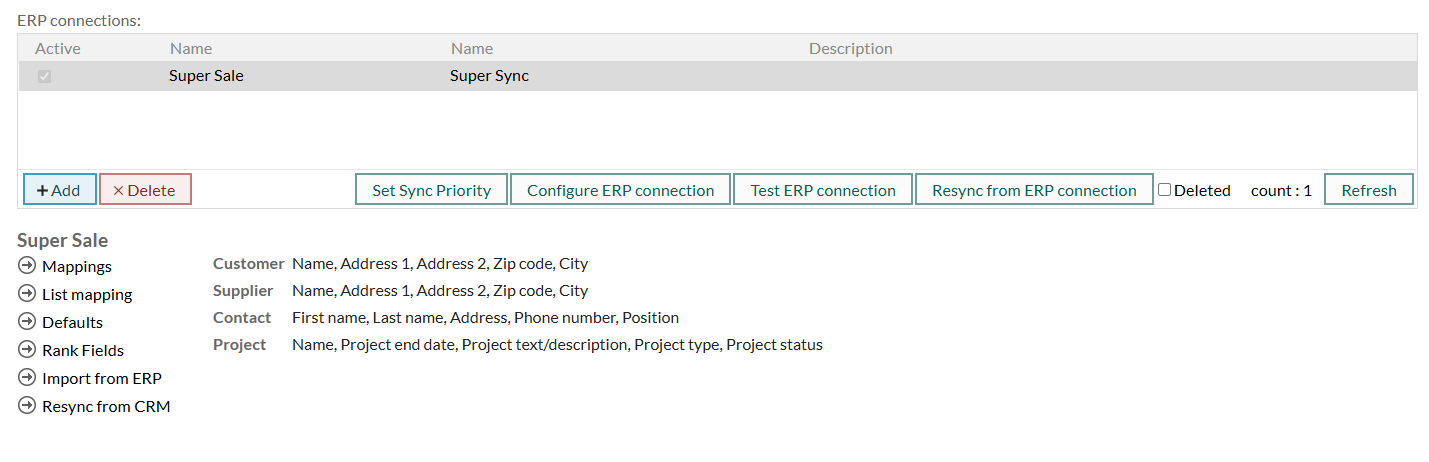
Configure ERP connection
After adding an ERP connection, you must configure how data is synchronized between SuperOffice and the ERP system. You do this using the buttons at the bottom of the Sync tab in the Quote/Sync screen.
Field mapping
Field mappings define how ERP fields correspond to SuperOffice fields and how data flows between the systems. The available ERP actors and ERP fields are provided by the sync connector and may vary depending on your ERP system. In addition to setting the synchronization direction, you can also choose which fields should appear in the search window and in the ERP tab in SuperOffice CRM.
Select the ERP connection and click Mappings in the lower-left corner.
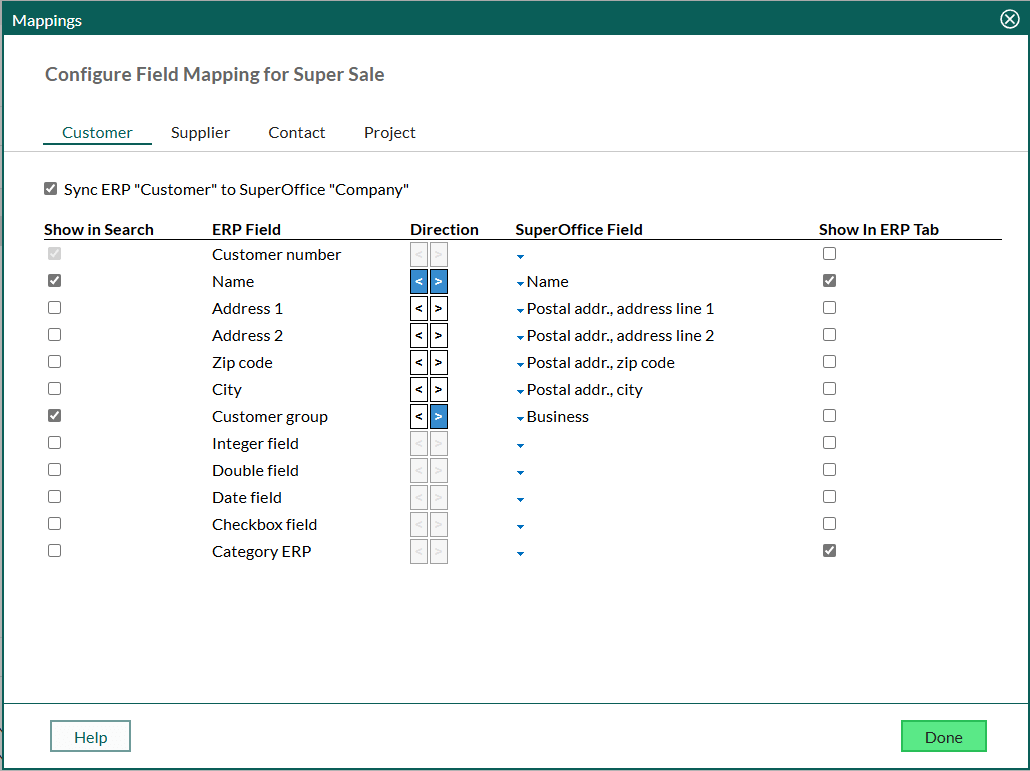
The Mappings dialog opens, showing tabs for the available ERP actors (such as Customer, Supplier, Contact, or Project).
Select the tab for the actor you want to configure.
Check Sync ERP "[actor]" to SuperOffice "[entity]" to enable synchronization.
For each ERP field in the list, specify:
SuperOffice field: Select which field in SuperOffice the ERP field should be mapped to.
Direction: Set the sync direction. Use > for ERP to SuperOffice, < for SuperOffice to ERP, or < > for bidirectional sync.
Direction buttons have three states:
- Gray: Disabled. You must select a SuperOffice field first.
- White: Enabled, not selected.
- Blue: Selected.
Show in Search: Check to display this field in search results.
Show in ERP tab: Check to display this field in the ERP tab in SuperOffice CRM (Company, Contact, and Project screen).
If a field is synchronized, it is usually not necessary to show it in the ERP tab.
Repeat these steps for other actors as needed.
Click Done when finished.
You can now continue with list mapping, default values, or ranking fields or activate the connection if no further configuration is needed.
List mapping
If you mapped any list fields, such as category or status, you must also map the individual list items between the ERP system and SuperOffice.
Select the ERP connection and click List mapping in the lower-left corner.
In the dialog, select a list. The corresponding ERP and CRM items are displayed.
If no lists are available, check that the related fields were mapped in the Field mapping dialog.
For each ERP item, select the matching CRM item.
Each ERP item can only be mapped to one CRM item. Duplicate mappings are shown in red. To leave an ERP item unmapped, select (No Selection).
Repeat for all relevant lists.
Click Save, then activate the ERP connection if no further configuration is needed.
Default values for synchronization
Default values help reduce manual data entry for fields that typically have a fixed or predictable value. This is especially useful when importing large volumes of data or when users should not have to fill in the same value repeatedly or check a box that should always be checked.
Select the ERP connection and click Defaults in the lower-left corner.
In the dialog, select the tab for the actor you want to configure.

Click Add to define a new default. The Add sync default value dialog opens.
In the dialog:
- ERP field: Select the field you want to define a default for.
Then choose how this field should behave:
- Set default value: Automatically apply a specific value during synchronization. This option requires you to enter a value.
- Ask user for value: Allow the user to enter a value manually.
- Mandatory – User must fill in value: Require that a value is provided. If this is selected, you must also choose one of the two options above.
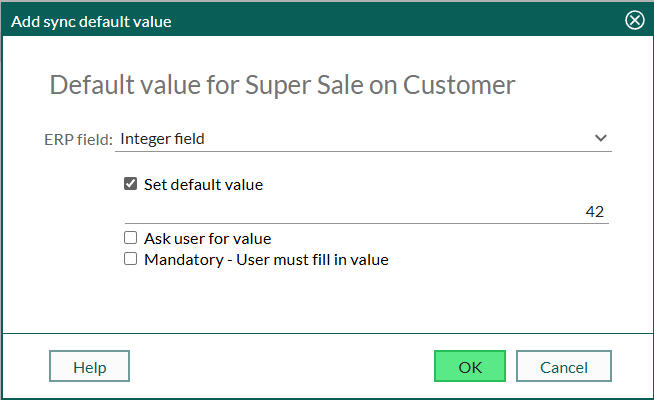
Click OK to save.
Repeat as needed to define more default values.
Rank fields shown in the ERP tab
Set the order of fields shown in the ERP tab of the Company, Contact, and Project screens. All available fields are listed here, but only those marked for display will appear in the tab.
Select the ERP connection and click Rank Fields in the lower-left corner.
In the dialog, select the tab for the actor you want to configure.
All available fields are listed, including those not shown in the ERP tab.
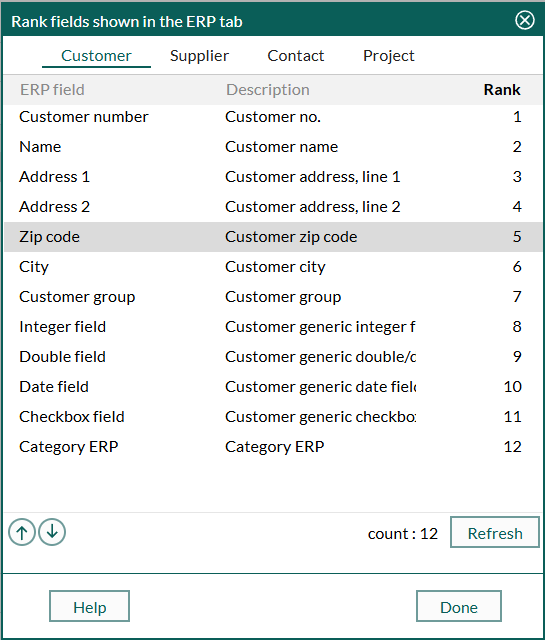
Select a field and use to change its position in the list.
Repeat as needed for other actors.
Click Done to save your changes.
Set sync priority
If multiple ERP connections are active at the same time, you can define which connection should take priority in case of heavy data traffic.
Click Set Sync Priority below the ERP connections list.
In the dialog, select a connection.
Use and to move the selected connection up or down in the list.
Click Done to save your changes.
Troubleshooting
Cannot activate ERP connection
If the ERP connection cannot be activated, check the field mapping:
- Mandatory fields must have a synchronization direction.
- Any configuration errors will trigger a descriptive error message.
- You must correct the issues before activating the connection.
Sync direction buttons are not available
If the direction arrows remain dimmed even after selecting a SuperOffice field, it may be due to one of the following:
- The field cannot be synchronized (for example, an ID field or read-only data).
- The field is not valid for the selected ERP actor.
Hover over the arrow to see a tooltip explaining why it is unavailable.